For this party I decided to change the venue. It was still at my parents house but I moved the whole party down into the finished, walk-out basement. Since we have that area set up as the playroom already, I figured this would be the perfect place to have a family party. Plus, we bought an inflatable bounce house that was in the backyard and this way the kids (and adults) would have easy access to it. There's a refrigerator and sink down there along with a bathroom and with it being the coolest place in the house (temperature-wise) it made perfect sense during the hottest week of the summer. We only had to make some minor adjustments to the layout of the room and we brought in our futon for additional seating but A and I are loving the new arrangement and hope to keep it that way until we're told otherwise.
I actually went really low-key on this party. After I went completely overboard with the Alice in Wonderland decorations last year, I kept the decorations for this party incredibly minimal and went fairly simple on the food. The goodie bag was the most time consuming part but thankfully my aunt and cousin came early and she and A helped me finish the last of the treats in there.
The invitation this year isn't my favorite. I feel like it's just too busy but K loved it and that's all that really matters. My favorite is still the Toy Story one for her third birthday and I tend to compare all other invitations to that one.

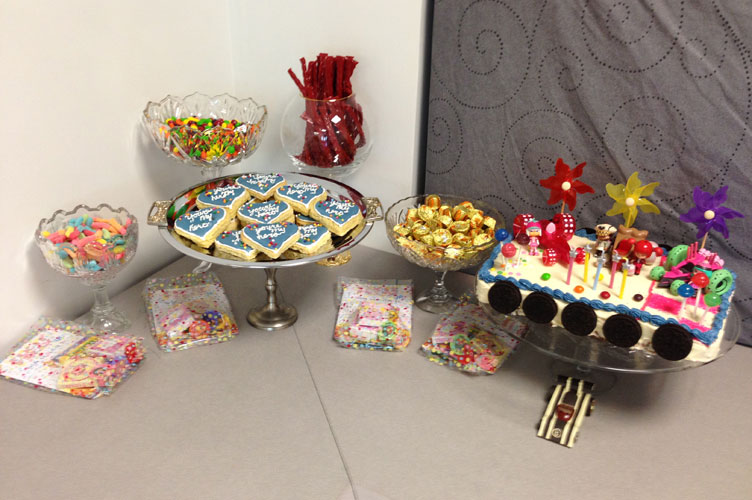
The cake is also incredibly busy. I came up with the idea to make it into the finish line of the race track and thought "It would be so cool to use her toy cars on it crossing the finish line." I didn't realize, however, that they would be so big on a 9" x 13" cake. And I knew K wouldn't want me to leave any of them out. As it was, I had to eliminate one car but at least I got all 4 of her toy racers on it. K loved it and her only request was to put some Skittles on it so I added a few near the candles but they weren't on it yet when I took this picture.

One of my favorite things to look at and eat were the "You're My Hero" cookies we made based on the movie. They turned out looking fantastic and tasted awesome but my gosh, the recipe I used was for drop cookies instead of rolled and I sifted my flour when maybe I shouldn't have... Needless to say it was the stickiest, most pain in the butt dough I have ever tried to work with. I was so close to just scraping the whole homemade part and buying a tube of sugar cookie dough from the store. Thank goodness A and my mom helped because they actually ended up tasting amazing. Here's a side-by-side comparison of ours versus Vanellope's medal from the movie.

Since the theme of the party was about a video game where everything is made out of candy, we had a big candy bar set up in two stations on the table. Below is the area that had the cake and cookies. The candy, cake and cookie stands were all made from candlestick holders and bowls and platters I found at Goodwill. I used clear epoxy to glue them together and they held up wonderfully. I think they were really cute all grouped together and the most expensive one was $2.99 so definitely a good project for the money. You can also see the goodie bags in this picture. A bit later on is a detail photo of what went inside.
My awesome cousin made these beautiful poofs out of paper lanterns and hundreds and hundreds (maybe thousands?) of coffee filters. I still have them hanging in the basement because they're so pretty and I don't want to give them back just yet ;) They look so frilly and lacey and just, girly. I love them!
For food I ordered 6 extra large pizzas and made a salad bar (to counter act the candy bar) and we had a few different types of chips and dips out around the room for pre-party noshing. Like I said, I went very low-key this time. You can see on the left side of this picture the other part of the candy bar but I'll explain it in further detail tomorrow.

The only other decorations were three tissue paper poms (two were recycled from last years birthday party), the polka dot Happy Birthday banner from my nieces party back in April, and the polka dot pinwheels from her party were out in the yard. Since there isn't a ton of merchandise for The Sugar Rush Racers specifically it was nice to be able to reuse fun, bright colored decorations from previous parties and not buy new stuff.

The goodie bags were one of the few places where I was able to do something specifically based on the Sugar Rush Racers. Spoonful.com is a division of Disney so they have a ton of Disney movie related crafts, recipes, games, etc. From their site I made the peppermint barrettes, the Felix / Ralph activity books (Felix is on one side and Ralph is on the flip side), and the Sugar Rush charm bracelet. The stickers came from the Dollar store, the Sugar Rush rings were a purchase from Amazon and the crayons came from Target. The charm bracelets are so neat because they were made using inkjet printable Shrinky Dink paper, and if you don't know what that is, it prints just like normal paper and then you cut out the shapes, lay them on a parchment covered cookie sheet and bake them in your oven for a few minutes until then come out shrunk about half the size and hard like plastic. Very cool! The barrettes are made out of polymer clay and then baked in the oven and covered with a coat of Mod Podge. I made a set of these and the bracelet for each girl (minus E) but I'm still hesitant to let K wear hers. While E seems to be out of the 'putting everything in her mouth' stage already, I'm more concerned with her pulling on the charms and either breaking one of them or the chain, and if one of the clay peppermints came off, they actually do look real enough that I worry she would try and eat it. Maybe she can wear them to school and then take them off when she gets home... at least until E is just a bit older or we become a little less paranoid.

And there you have it. Even though some of the decorations and treat bag items are DIY type of crafts I don't have any tutorials because they are either easy enough to figure out on your own (like the candy dishes) or you can find online (like the charm bracelets.) If you do have any questions though, please don't hesitate to ask me. Tomorrow I'll cover the fun candy game, opening gifts and the bounce house (us cousins had way too much fun in there) and that should wrap it up. Thanks for checking it out!
No comments:
Post a Comment