Saturday, December 6, 2014

Recipe: Turkey and Wild Rice Soup

I'm probably a few days too late with this post but if you still have leftover Thanksgiving turkey and are wondering what to do with it, I highly suggest making it into this soup from allrecipes.com. (Or, you can plan ahead and keep some turkey from Christmas if you make it then too.)

We had everything on hand already except for the wild rice. I happen to be shopping at Cost Plus World Market and came across this grain and pasta medley. It was perfect for the soup. The surprise ingredient is the almonds and they give this soup a wonderful crunch. It's really delicious!


Serves 8

Ingredients:
2/3 cup uncooked wild rice
2 cups water

6 tablespoons butter
1/4 cup finely chopped onion
1/4 cup finely chopped celery
1/3 cup all-purpose flour
4 cups turkey (or chicken) broth
1/3 cup shredded carrot
2 cups chopped cooked turkey
1/2 teaspoon kosher salt
1/2 teaspoon ground black pepper
1/4 cup chopped slivered almonds
1/2 teaspoon lemon juice
3/4 cup half-and-half cream


Directions:

  1. Bring the wild rice and water to a boil in a saucepan. Reduce heat to medium-low, cover, and simmer until the rice is tender but not mushy, 40 to 45 minutes. Drain off any excess liquid, fluff the rice with a fork, and cook uncovered 5 minutes more. Set the cooked rice aside.
    *Alternatively, follow the instructions listed on the wild rice of your choosing.*
  2. Melt the butter in a soup pot over medium heat. Cook and stir the onion and celery until the onion is translucent, about 5 minutes. Gradually add the flour to the turkey broth and pour in the pot. Stir in the carrot. Bring the mixture to a simmer, and cook, whisking constantly, until the stock is thick and smooth and the carrot is tender, about 2 more minutes.
  3. Stir in the cooked wild rice, turkey, salt, pepper, and almonds. Return to a simmer, and cook 2 more minutes to heat the ingredients. Stir in the lemon juice and half-and-half; bring the soup almost to a boil, and serve hot.

Wednesday, November 26, 2014

Fun Thanksgiving Treat: Hershey's Kiss Acorns

Hello! I'm sorry for the nearly one month break. I've been having a hard time juggling time with the kids and personal down time. I think about writing a blog post but then I end up watching back episodes of Pysch on Netflix instead. Anyway, a while back I came across these cute acorn treats on some blog site and thought they would be cute to make for Thanksgiving. If you do a quick Google search of Hershey's Kiss Acorns you'll find several variations of the same basic idea.

Here are the ingredients I used:

1. Some kind of icing or frosting
2. Thin pretzels
3. Hershey's Kisses
4. A small cookie with a hole in the middle

A couple of notes on my ingredients - When I make these for the actual Thanksgiving day, I'll be using pretzel sticks. Since this was just an experiment and I wasn't sure if anyone would like them, I wanted to buy the smallest bag of pretzels I could find and this Snyder's bag was it. Also, if you're ever in need of a small amount of Kisses, I found this little bag at the Dollar Tree. It was more than I needed but not by too much. Lastly, the 100 Calorie Packs of the Keebler Fudge Stripes has 10 cookies in it so if you buy a box of these you should have enough to make them for a crowd.


I didn't take step-by-step photos because it's just too easy. Break a pretzel stick into smaller pieces and feed it into the hole of your cookie. Squeeze (or spread) a small dab of icing on the bottom of the Kiss and press the cookie onto it. I put mine in the refrigerator for a few hours but I'm not sure you have to. The nice thing about this particular recipe is the saltiness of the pretzels enhances the chocolate and helps balance out the sweetness of the cookie. It's a great bite-size treat.


Plus, they're cute and very quick to put together. This is a great project to let the kids help with.

Happy Thanksgiving to you and yours from the JAKES!

Friday, October 31, 2014

Happy Halloween!

Hello everyone. I hope you are all staying warm and having a happy, spooky Halloween.

This year, {K} & {E} are going as the most original costumes ever... wait for it... Elsa and Anna from Frozen. I know you're shocked. But they love that movie so much and it's what they wanted and with the plethora of available gowns, I didn't have to sew anything so a win for me as well.

Without further ado, I hereby present Queen Elsa and Princess Anna of Arendelle!


I actually took the photos above a few days ago when we had beautiful weather instead of the snow flurries we're having today.

The pictures below are from this morning. {K} didn't want to wear a wig so we braided her hair and used a can of gold hair paint to try and make it look a bit more like Elsa's.

This is from the parade at her school:

I hope you all have a wonderful Halloween and stay warm! I think we'll hit one or two houses of nearby friends and then go to the library for indoor trick or treating. Brrr!

Tuesday, October 14, 2014

Muffin Tin Tuesday, On A Monday!

Hehe, my title reminds me of this quote by Wyldstyle from The Lego Movie: "Today will not be known as Taco Tuesday, it will be known as Freedom Friday! But still on a Tuesday!"

Ever since [K] started first grade we've had to give up Muffin Tin Tuesdays since she eats lunch at school now <insert sad Mom face>. However, since she had the day off today I decided to make it a Muffin Tin Monday.

This was [K]s:
Top row: pizza, grapes, cherry tomatoes
Bottom row: Annie's Bunny Fruit Snacks, mandarin orange, sugar snap peas
(I know it looks like she only had three bites of pizza but fear not,
the rest of the piece was cut up on a separate plate for her.
This was [E]s:
It's essentially the same stuff but in smaller quantities. I swapped out Ritz crackers
for the pizza and took the peas out of her pods but those are the only differences.

I also found these two in my blog photo archives and figured I'd share them as well.

This was [K]s:
Top row: blueberries, carrots, chicken, ketchup
Middle row: macaroni and cheese, blueberries, broccoli, mandarin orange
Bottom row: broccoli, carrots, macaroni and cheese, chocolate pudding
And this was [E]s:
Top row: slice of wheat bread, green beans, apple slices
Bottom row: chocolate cat crackers, apple slices, mini dill pickles
Thanks for reading and have a fantastic day!

Sunday, October 12, 2014

My Little Pony Math is Magic - Homemade Math Game

Shortly before Christmas last year I received an educational toy catalog that included board games designed to incorporate math. While I thought the concept of the game was great, I just didn't think it would really be that *fun*. It didn't seem to be much of a "game" but more of a way to practice addition. However, the idea of it sparked an interest in me to see if I could create something better. It ended up taking me all the way until her birthday in August before I got it finished.


I loved the idea of having the dice poppers because I remember playing the game Trouble as a kid and loving popping that die. Maybe I'm the only one... I hope not. Anyway, I did some research and I couldn't find anywhere that sold just the dice poppers. I could buy two copies of the modern version of Trouble and use those poppers but it seemed like a waste of money. I found a cool Makezine article on how to make my own dice poppers and I was very close to going that route. What I ended up doing though was finding a copy of the vintage game Double Trouble on eBay.


Now the question became, how can I design a board game that incorporates math but is also fun to play? The answer came in three parts. For the first part I needed not look further than [K]s bedroom. The obvious answer was My Little Pony Friendship is Magic.


The next part was to figure out how could I make the game? I decided to use the board from the Double Trouble game I bought and adhere my new game design right over the existing board. I was able to remove the two dice poppers and the plastic spinner pieces which left me with a flat, non-folding 19" x 9.5" playing surface.


The last step, and admittedly the hardest, was figuring out how I was going to design a board game. I can't draw to save my life so I did a Google Image search on board games and ended up with one that I liked based on Nickelodeon's Phineas and Ferb. I liked the layout of the squares as well as the colors and that it wasn't too busy but still had characters and scenery on the board. The problem was that the only copy I could find was a small, low-res version which wasn't going to cut it for my actual game. I ended up opening the low res image in Photoshop and scaling it up to the size of my game board. Obviously, it looked horrible and pixelated but at least I was able to use it as a guide for drawing my own lines over the top of it. Then it was just a matter of filling in the background, the game squares, coming up with pony-appropriate special squares, and finding pony images to use on my game. Overall, I'm super happy with how it turned out. But, how to get my design onto the game board...? For this, I called in a favor with my previous employer


I used to work for an amazing company called IT Supplies. They provide everything you need for printing at an amazing price. I sent my file over to them and explained what I was making and asked if they had any kind of paper that would fit my needs. Not only did they have the *perfect* material (Photo-Tex Adhesive Removable Fabric) but they even printed my file for me (twice!) and another file as well (more on that later.) The problem with this first prototype is that the Photo-Tex isn't 100% opaque so the red and blue game design of the original Trouble game showed through. I was going to leave it but when I was designing the box cover I ended up liking that so much that I decided to change my original board design to look more like the box. That gave me the chance to take the green design off and then I could paint a light coat of white paint on the board so when I adhered the new game design the Trouble images didn't show through anymore.


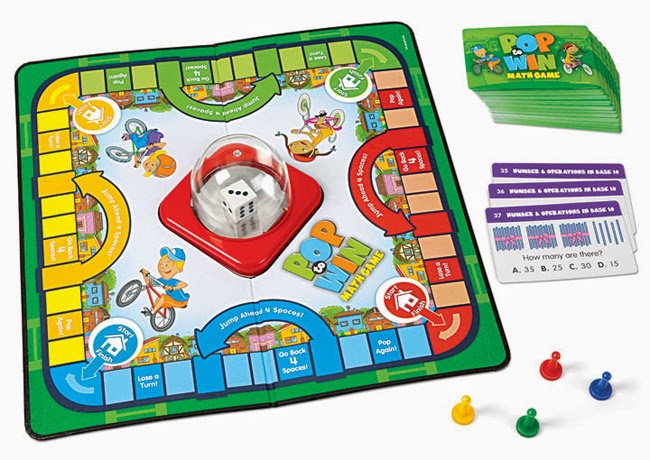
At this point I realized I wanted to incorporate more math than to just pop the two dice, add them up, and go that many number of spaces. I wanted a way to keep the game interesting for a longer period of time and to make it more educational. The answer came in another Google search where I found this math game that uses cards with math problems on them that you have to answer first, and then you pop the die and move around the board.


I loved this idea because then I could incorporate any kind of math I wanted (place value, units of measure, money, time, etc.) and still use the dice popper as the way to move your piece around the board. In fact, if I had seen this game first, I probably would have bought it instead of making my own but then it wouldn't have had the extra fun of being about My Little Ponies so in hindsight, I'm still glad I ended up designing it myself.


Around this time I decided to scrap the idea of using two dice poppers and scale it back to one. I figured if [K] would be solving math problems on the cards there wasn't as much of a need for two poppers and adding up the numbers on the dice. Unfortunately, when I designed the layout of my game board I forgot to leave room for the poppers on the actual board. [A] came up with the brilliant solution of having the popper be on its own separate mini board (like how other games have separate spinners). To make it I used a very sturdy piece of cardboard we had laying around the house, covered it with some of the Photo-Tex I had them print for me, and then used black electric tape around the edges. I even added little outlines on the mini-board to show where to place the cards and the die popper. I used extra-strength Velcro to attach the popper to the mini-board to make it easier for the kids to pop, and everything fits neatly in the game box.
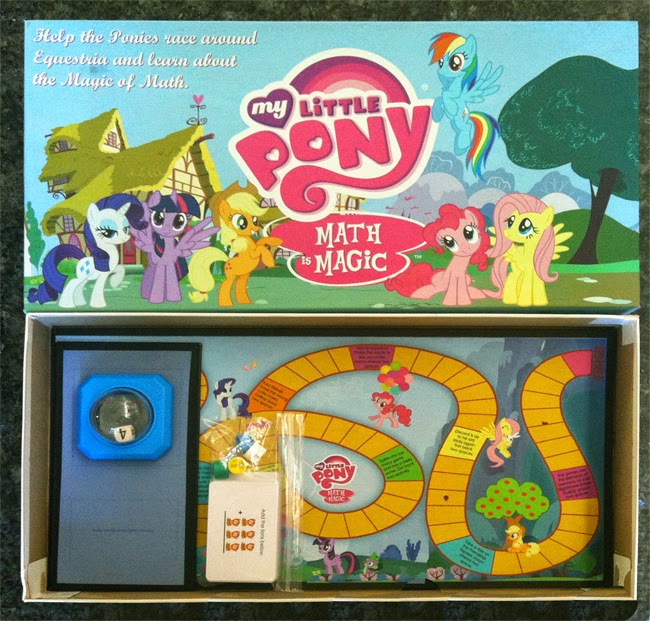

Oh, speaking of the game box, that was another step in the design process. I needed to design a box cover! Another Google image search resulted in a great background image of Ponyville and all I needed to do was add the ponies, add the name of my game (My Little Ponies Math is Magic), and a description of the object of the game. Along the sides of the box top I added the name of the game on the two long sides and "Happy 6th birthday, [K]!" to the two short sides. It turned out awesome! But the real test would come when I gave it to the birthday girl.


Huzzah! She loved it! We played twice the first day and several more times since. Phew! Even though this was a lot of fun for me and an awesome learning experience, it was a TON of time and work and I won't lie, I would have been pretty crushed if she was like, "Meh, it's ok." Thank goodness I know our girl well enough to know that a math game involving ponies is still a game about ponies and that's pretty cool in her eyes.
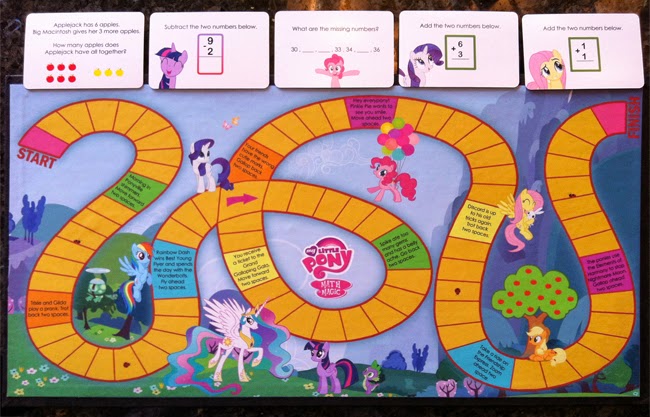

So, if you made it this far with me then you really deserve some kind of reward. I actually have two copies of the My Little Pony Math is Magic game board, dice popper, and game pieces (well, I only have three game pieces so the fourth one is a thimble). If you're interested in having your own copy please leave a comment on my blog or Facebook and I'll have my hubby create some way to randomly pick a winner. The contest will be open until 9:00 AM CST on October 26th. (By the way, if you want a set of the math cards I can email you the files I created and you can have them printed where I did at Make Playing Cards. I can walk you through the process if needed.) Oh, and if you want to leave a comment but don't want to enter the contest, just let me know that as well.


Thanks for reading and good luck!

Thursday, October 9, 2014

Mini Getaway to Door County, WI

There are three couples I know who frequently travel to the quaint and beautiful area known as Door County, Wisconsin and since I had never been and trust their opinions, I decided it was high time we took a family trip to check it out for ourselves.

Our first stop was at The Farm in Sturgeon Bay. It's a neat place where the kids could feed baby animals from bottles, pet farm animals of all kinds, and see a baby lamb that had just been born. We named this baby goat "Mappy" because after scarfing down the bottle he kept trying to nibble on the map that [E] was carrying around.

[K]'s favorite part were the baby chicks. She loved them so much and wanted to hold one but she was a little nervous to actually do it herself so I held a chick for the first time myself so my baby could pet one. I've done so many new things since having children :)

One of the main things I had heard about Door County is that there are great bike trails in Peninsula State Park and I have been wanting to take a family bike ride for so long. The problem is that [K] is still using training wheels and she's afraid to go too fast so it makes riding together nearly impossible. My sister-in-law has this detachable tandem bike trailer and I thought, "that would be great for [K]!" However, one spin around the block and she was scared. We waited a year and while searching for the same trailer on Craigs List I came across this recumbent version on Amazon. After reading the reviews and telling [K] that it would be like riding in a stroller, we brought it with and tried it out. She loves it! She's been telling us that she wants to bike ride all the time. [A] and I love biking so this has been a major win for us. Now we just have to decide if we get another one for [E]...

(And just in case you were wondering, the bike seat we used with [E] is this front-mounted Safe-T Seat from iBert.)

Anyway, back to our trip. Peninsula State Park is lovely and the bike trails are gorgeous. In the park is the Eagle Bluff Lighthouse. We happened to get there just before they were having a flag changing ceremony so we were able to get our picture taken with a lighthouse keeper reenactor.

Back on our bike ride we stopped at Nicolet Bay where [K] had the opportunity to throw pebbles into the crystal clear water.

(Hmm, I wonder where she gets that from...)
(This was taken in Sister Bay at the Waterfront Park.)

After arriving back at our car we took a drive around the park, stopping at Sven's Bluff (below) and climbed the Eagle Bluff Tower for panoramic views of the bay.

That evening we partook in a very unusual, but uniquely Door County, dining experience called a fish boil. Lake Michigan whitefish are cooked outside over an open fire in boiling water. Fish oils rise to the surface of the boiling cauldron, and when the fish is perfectly done, the Master Boiler tosses a small amount of kerosene on the flames under the pot. The great burst of flames causes the boilover, spilling the fish oils over the side of the pot and leaving the fish perfectly done.

And before the night was over we stopped off at Sunset Beach to watch, what else, the sunset.

The following morning we had breakfast at Al Johnson's Swedish Restaurant where goats eat grass on the roof. I couldn't resist putting this Viking helmet on [E]. The braids matched her hair perfectly.

I'm a huge lover of lighthouses so I really wanted to stop by the Cana Island Lighthouse in Baileys Harbor. The island is connected to the mainland by a causeway that is covered in all different sized rocks. I hate to say it but my favorite part from the trip to Cana Island were all of the rock towers built by visitors. There were probably 100+ all of different sizes up and down the entire causeway. Both girls had to stop and build their own. The hardest part was trying to keep them from knocking them all down.
(Ok, maybe [E] had some help with hers from Daddy)
The lighthouse looks quite picturesque in my photo but the truth is it needs a paint job and there was construction on either side of it (restoration from what I understand.) The biggest bummer part of it is that you have to pay money just to see the lighthouse. I understand paying to climb it and I know they need funding to keep it going but I've never encountered having to pay just to see one.

The last part of the day was spent hiking in Whitefish State Park. We had a nice time there but I'll bet it would have been even better if it was warmer and we could have played on the sandy beach. All in all though the entire trip was a ton of fun and I'm looking forward to going back next year!

Sunday, October 5, 2014

K's 6th Birthday Party: Rainbows and My Little Ponies

Back at the end of August our beautiful daughter [K] turned 6. It was a wonderful, magical day filled with love, laughter, rainbows and unicorns (and pegasi and earth ponies.)

For the invitation this year I used a stock design from Shutterfly. I had a voucher for 10 free cards from collecting Huggies points on wipes. I love how vibrant the colors are on it.


While [K] was sleeping I hung this wall-sized My Little Pony mural in her room. It is so huge that I had to hang the top banner part on a separate wall. I put that part on the wall above her bed and the rest on the opposite wall so she would see it first thing when she woke up.


I kept the table decorations simple with bouquets of rainbow hued flowers.


My family always hangs a "Happy Birthday" banner and this year I chose this My Little Pony Jumbo Banner. They weren't kidding when they said jumbo - it's 10 ft long!


The pièce de résistance though was the balloon arch. We blew up approximately 100 balloons for this thing but it was 100% worth it! It was so cool looking.


I printed a multi-page image of Rainbow Dash for the girls to play "Pin the Cutie Mark on the Pony."


I made the treat bags from blue handled bags bought at the dollar store with a large print out of Rainbow Dash's face glued to the front.


Inside was a sheet of rainbow tattoos and stickers, glow bracelets and a colored clip-in hair extension. I was lucky to find a bunch of My Little Pony items in the dollar section at Target including an activity book, pencils, mini gel pens and the Rainbow Dash puzzle. I printed the book marks from an image I found on a Google image search. They're super cool.


The food consisted of fairly normal party fare except for this beautiful rainbow fruit salad [A] made that was as delicious to look at as it was to eat.


The birthday cake was something I've been dying to try for quite some time. Thankfully it turned out amazing and [K] loved it!


At the end of the evening we were even graced with a night sky rainbow, courtesy of Rainbow Dash herself, of course (according to the birthday girl.)

Like I said, it was a truly magical day for a truly magical girl. We love you [K]!