Friday, July 16, 2021

Master Bedroom Overhaul

MASTER BEDROOM OVERHAUL Do you know how when you move into a home that it always seems like the last room you remodel is the master bedroom? At least that's how it happened in our home. But no more! I'm SO happy we finally took the time to redo our room. I absolutely love it!


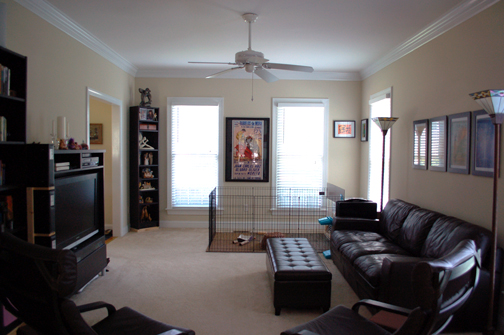
This is what our bedroom looked like when we moved in. It was pretty but the blue made it feel dark and dated in there. Plus it made it difficult to decorate since our color pallet was limited to what matched that very specific blue.


Here are a few more "Before" photos while I was getting ready to paint.


Painting over the blue took one coat of primer and two coats of paint. We used Sherwin Williams in Alabaster White. This is also the first time that we painted the ceiling the same color as the walls. It's a game changer! It was definitely easier to paint when I didn't have to worry about taping off the ceilings.


We decided to make the back wall into a focal wall by painting it Caraibe also by Sherwin Williams. It's such a warm, chocolate brown. It adds such elegance and dimension to the room. I was particularly proud of the crisp lines we achieved.


This is my favorite trick to paint baseboard with carpet - Press 'N Seal and a four inch putty knife. Rip off short pieces of Press 'N Seal and use the putty knife to tuck it underneath the baseboard. Perfect!


One of my favorite features in the room is the huge gallery wall. We all chose photos from vacations and of the kids that we liked and I bought the 11" x 14" frames from Amazon. Normally I hang gallery walls with 3M Command Picture Hanging Strips but because these are larger, I decided to hang them with nails the old fashioned way. I started by hanging the top row, making sure each photo was level with the last, and each was evenly spaced between. Then I hung the first column, again making sure each was evenly spaced and in alignment with the one above. Once that was finished, it was much easier to hang the rest. I did notice a few off skew (after I took the photo, of course) and went back with some Scotch Removable Mounting Putty (the stuff we used to hang posters in college) to make sure everything stays level.


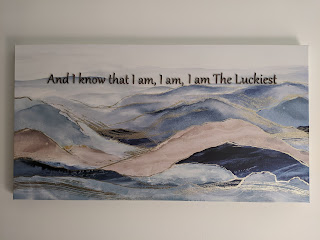
I had one last special project for our room. I bought two beautiful abstract canvas prints from Hobby Lobby, one that looked like the ocean and the other like the mountains. I wanted to add lyrics to them from the our first dance song, The Luckiest by Ben Folds. I asked my bestie over at Snarky Yet Sweet to make the words for me. Originally I thought she'd make them out of vinyl but then I wasn't sure how I'd apply them. She had the brilliant and beautiful idea to make them out of wood on her Glowforge. I could not be more pleased with them - I love them so much!


The last additions to the room were these beautiful hexagon shelves from World Market, brass curtain rods, new drapes, the wood words above the bed, and the candles. The accessories on the shelves and dressers are either ours or purchased from Target.


I am SO happy with how this room turned out. It's so calming yet bright. I love the neutral palette so I can play with comforter and pillow colors.


We have a ton more projects that we've been doing over here so look for those coming soon! - {J}


Friday, December 20, 2019

Foyer Closet Redo in Photos

This is how our foyer looked. There were four doors all opening into this same small space. The closet door (the door on the left) and the garage door (directly perpendicular to it) would bang into each other, so much so that there was a dent from the lock of the garage door in the ball handle of the closet door. It was too much and since I couldn't very well remove the garage door, the front door, or the office door, the closet door it was!

The first thing I did was paint the inside of the closet. It was plain white before and scuffed up like crazy. I used Window Pane from Benjamin Moore. It's a gorgeous color, plus it's in the adjoining office so it ties this area into the one next to it. What you don't realize is that we have nine foot ceilings, this closet is quite small, and it has no light. I was sweating like crazy on our large ladder in the dark trying to paint. Not the most fun.

Here's how it looked after finishing painting and removing the door. Previous owners must have had something hanging over the top of the door that left scuff marks on the top of the frame. There were also recesses where the hinges were attached to the frame as well as a hole for the latch.

I used Plastic Wood Filler from DAP to fill in all of the holes / chiseled areas. It was a bit of a process; filling it in, sanding it down, filling in more... to try and get it even with the existing trim.

Here it is with the trim all flush and painted. It's looking pretty good! The next issue was how to store our shoes. Each of us have several pairs of shoes that I like to keep near the door. I didn't want a huge shoe rack because I also want to hang coats in here.
 
I ended up finding these hooks from IKEA called Tjusig. They can be used for hats, scarves, coats, and shoes! We have three hanging end to end so it looks like one big long line. We have six of these total, three on each side.
Here they are in action. Since the closet has such high ceilings, I needed a small step stool in order to reach the top of the hooks. It was functional at this point but I still needed to hang coats.

It took me so long to decide how I wanted to hang the coats that I ended up changing my mind and found this amazing peel and stick wall vinyl called Arrowhead Peel & Stick NuWallpaper by Wall POPS!. When I tell you this was the most challenging project in this house, I'm not exaggerating. There isn't a single straight corner or wall in this entire closet. And remember how I said it's tiny, and dark, and hot, and tall? I ruined 9 feet of one roll trying to hang this stuff. Eventually I had to ask {A} to hang it for me because I was so frustrated and he's so much more meticulous than I am. I will be forever grateful that he did this for me because I love it so much.

On Thanksgiving day, I cut, hung, and calked the 1x2's. There are no useful studs behind this wall so I used these drywall anchors, E-Z Ancor, that are designed to hold up to 100 pounds each. Then I just screwed the hooks into the boards and they're good to go. These are the hooks I used. I love them, they're beautiful. I also upgraded the stool to this wooden one from Amazon. It's awesome.

And here it is complete with coats. I'm really, really happy with how it turned out. Each hook can hold two or more jackets (there are seven hooks - four on top, three on bottom), there's room for eighteen pairs of shoes, and it looks great too! It wasn't an expensive change or even really all that difficult (except for the wall vinyl) and it's really such a nice improvement. - {J}

Friday, July 15, 2016

North Carolina Home Tour - Part 1

Hi! It's been a while. I have this super awesome blog post for y'all but I can't publish it because my dear sweet bestie has demanded asked that I post some photos of the home we're renting here in NC. I've been putting it off because I haven't been able to stage it like all of the other blogs that do home tours (i.e. throw everything that proves people actually live there into a closet) but then I realized that unless my schedule drastically slows down and my children go off to camp for a week or two, that's never going to happen. Oh well, this is reality people. Also, just to keep it extra real, [E] decided she needed to be in *almost* every photo :)

This is (obviously) the outside. I took this photo in January so unfortunately the grass was still brown and patchy and the trees weren't in full bloom yet. But hey, who am I kidding? This was taken in JANUARY! And there isn't snow. Ahhh ;) 

Here we've walked through the front door and in front to your left is a small entry way. Since we aren't that far from the beach and I love seaside decor, you'll notice this theme throughout many rooms of our house. (Crazy girl had to jump in front of my camera every chance she could.)

Continuing to your left (through that doorway to the left in the photo above) is the living room which is approximately one quarter taken up by our fluffy bunny and his enclosure. In this photo I'm looking back at where you just walked in.

So looking at it the living room from the other direction (as if you had just walked in that doorway) you can see the playroom through the double wide entry. It's actually the formal dining room but it's way cuter as a playroom. Plus, the kids can paint and use Play-Doh in there without me worrying about carpeting. And I can keep an eye on them while their playing and I'm doing dishes or ordering take-out making dinner.

Moving on into the playroom, you'll note that it's a cacophony of colors. Our girls love them some rainbow colors so between the decorations and the toys, it's a feast for the senses. You may notice there are some of the same toys as we had in [K]'s playroom at our apartment in OH (take a peek at this old blog post for a refresher) but we've actually gained some new ones. Shocking, I know. The toys would take over the house if I let them, not that I don't contribute some myself, much to the chagrin of my husband.

Looking back the other direction toward the living room. The pennant flags above the Muppets and their artwork spell out their names but they're pretty washed out in this photo. Also, there used to be a mini trampoline in the corner over there but literally a day or two before I took these photos it broke. Eventually I'd like to make the girls a play store for that area.

Moving on through the rainbow streamers is the kitchen. It's always kind of a jumbled mess so this was the best I could do. The kitchen really is the heart of the home, isn't it? Plus, why is it that no matter how big your kitchen is, it never seems big enough?

Looking the other direction is a disembodied baby head, the door to our deck (on your left) and the door to the garage (on the right.) The windows look out to the backyard. And if you turn around and head out the doorway in the photo above you walk past the laundry room on your left, the powder room on your right, and end up back at the front door.

So that's essentially the first floor of our house. I'll try and post photos of the upper floor soon but we have some work to do in the office and [K]'s room so it might be after the weekend.

Also, if you have any questions about anything you see in the photos, let me know. For the most part I can remember where I bought stuff, or if there's something weird looking that requires clarification.

Take care,
 ~ [J]

Sunday, May 15, 2016

E's 4th Birthday Party

I can't believe I somehow missed covering the incredibly fun party we had for the December Birthdays on my Mom's side of our family (minus one cousin who had moved a few weeks before) and for little E so she could still have a fun party before we moved.

I had wanted to do a fun circus themed party for awhile but I thought that probably it would have been for K's birthday since it's in the summer and then I could have had carnival type games outside. However, since she's older, she has her own ideas about what she wants for her parties.

Usually our parties are around the lunch hour but for this party we had a brunch with amazing homemade crepes made from an old family recipe. Such a good idea!!! I found this great idea from Kid's Birthday Parties on using cut marshmallows to look like popcorn on top of cupcakes.

I found most of the decorations at Target and they were even on clearance too! I had the girls color a few pages out of a Ringling Bros. and Barnum & Baily coloring book I had been holding onto.

I even learned how to make balloon animals for the party. I can only make a dog though. The lips and mustaches on the straws came from Catch My Party and they added a very fun touch. The kids loved playing with them, and by kids, I mean my Grandpa.


I had hot air balloons hanging over the dessert table. The mobile was one I found at Ikea quite awhile back and the paper ones I found on the Sparkle Power blog site.

The treat bags and circus animal headbands were also from Target. Unfortunately we never ended up using the face paint stencils. Bummer!

E loved her cupcakes (what's not to love - marshmallows AND Nana's famous buttercream frosting).

The birthday girl got some help opening her gifts from her lovely big sister, K.


It was a fantastic and memorable day for everyone there. We combined several traditions, had a ton of laughs, and enjoyed the company of some wonderful family before we moved. All in all, I'd say it was a success!

Take care,
~ J