Thursday, February 26, 2015

40 Bags in 40 Days

A girlfriend of mine recently posted a link on Facebook about something called 40 Bags In 40 Days 2015 Decluttering Challenge. What is 40 Bags in 40 Days? According to the website it's, "...a forty day period in the spring (coinciding with the 40 days of Lent) where you declutter one area a day. The goal is one bag a day but you can have more or less."

Baby boy clothing and toys (and yes, I know I have two girls
so why do I have three boxes full of boy stuff?)

24 month and 2T size girl clothing for the other sweet baby girls in our lives

Everything from newborn up to 18 months I haven't already given to friends.

Big box of larger baby toys our girls no longer play with
and a ride-on car we got for free from a Craigs List purchase

This awesome piano we borrowed from friends whom I'm
hoping know of other kiddos who can get further use out of it

Two huge bags full of stuffed animals that K is actually allowing
me to donate to S.A.F.E. (Stuffed Animals for Emergencies)

A small animal carrier and our original bunny habitat

And last, our crib which makes me very sad. (I'll explain why below.)

So here's the cool part about this whole project, at least for me. If you know me in person you'll know that I can't stand to throw stuff away (unless I deem it as junk and then I have no problem whatsoever.) However, I feel super guilty contributing to the landfills so usually I try to recycle or donate as much as I can. Recently, while I was trying to find someplace to bring our stuffed animals because most places won't take them, I came across these two links from Oprah on all of the different places you can donate almost anything. (This one is by location, and this one is to mail stuff.) The only thing I can't donate is the crib which is why it makes me sad. It was a beautiful hand-me-down from A's nieces but it's a drop-down side and no one will take those anymore. And although I've seen things on Pinterest on how to turn it into a desk or a child sofa, we just don't have the space for it.

So, I'm putting the challenge out to all of you. I don't know if I'll end up with 40 bags full or not, but at least try for one. If you can declutter one room or one bag full and donate it to someone else in need, that's a great start. Think of how much good we can do if everyone just did one bag.

Good luck and I'll see you on the flip side!

Monday, February 16, 2015

Recipe: Pesto Pita Pizza

Yum! This is one of those recipes that's super easy to make but incredibly flavorful and delicious to eat. This came right out of my Cooking With Trader Joe's Cookbook: Dinner's Done book but can be made with ingredients found in any grocery store.


Serves 2

Ingredients:

2 standard-size (7-inch diameter) pita pockets
3 Tbsp pesto (either store-bought or homemade)
1/2 cup shredded mozzarella cheese
1 ripe tomato, diced (about 1/2 cup)
2 Tbsp chopped fresh basil


Directions:
  1. Preheat oven to 400° F.
  2. Place pitas on baking sheet, lightly sprayed with cooking oil.
  3. Spread 2 Tbsp pesto on each pita. Top each with 1/4 cup of cheese.
  4. Remove from oven and top with tomato and basil.
Eat and enjoy!

Sunday, February 15, 2015

E's Third Birthday Party Part 2 - Food, Fun, & Treats

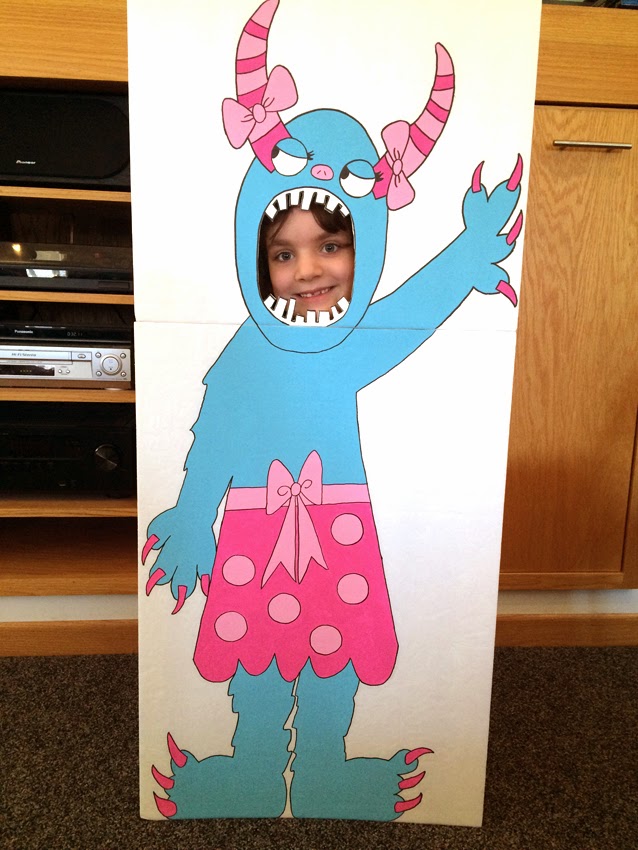
Hi and welcome back to the second part of E's third birthday party. Last time I showed you photos of the decorations and this time I'll cover some of the food, gift opening, and treat bags. Also, I've included a photo collage of several ideas I saw around the web that looked cool and I really wanted to do but ran out of time. However, if any of you plan to do a Monster-themed party (for a birthday or Halloween) then maybe you may be interested in some of them.

Here's E with Cousin C before the party started. They were comparing games on their devices.


For this party I served all foods that E really likes; deli sandwiches made with monster (Muenster) cheese, cheesey poofs (Pirate's Booty brand), my mom's potato salad, and this monster fruit salad.


For dessert I dipped marshmallows in melted chocolate and then in sprinkles. I also added several sour gummy worms among the marshmallows and the Oreo cookies.


I loved the cake! It turned out SO cute. I made the eye and lashes from craft foam and the pupil is a black bottle cap. My Mom decorated the cake using pink butter cream frosting piped on using a multi-opening tip, sometimes used for grass or hair. E loved it! She still talks about her monster cake.


When it came time to open gifts, K volunteered to write down all of the gifts for thank you cards. Isn't it great how Daddy is wearing a shirt that has a monster on it (Sully from Monsters, Inc.)


Here is the beautiful portrait K painted for E. They're such sweet sisters.


The treat bags were made from these monster bags I found in the dollar section at Target. In fact, I found almost everything for this party at Target. They had all of their monster themed party supplies on clearance so it worked out great for me :) As I mentioned in my last post, each girl got an Ugly Doll clip on monster and a monster face button that were attached to the bag handles. There were four kinds of monster stickers, make your own monster masks, monster finger puppets, Monster Match card game, monster eggs filled with more sour gummy worms, monster pencils, and Monster Mints.


This is E in the monster mask she made. (I might have helped a little.)


Below is the thank you card I made. Like the invitations I used a monster from one of the girls' books, photographed it, and recreated it digitally. I really like how they turned out. I have made many of their invitations and generally I like how they turn out but of course, some more than others. It's funny because I particularly liked the ones I made for K's third birthday and now also the ones I made for E's third birthday. I guess 3 is my lucky number ;)


And last but not least here are few more awesome monster ideas that I really wanted to do for this party but just didn't have enough time to do. I think I may do them still for Halloween this year.
From the top: a monster sandwich with olive eyes, monster front doors, monster juice boxes, and monster cans of Play-doh.


Thanks for reading. I have two crafts that I'm looking forward to sharing with you but unfortunately they're both past their holidays. Hopefully you can bookmark them for next year. =D

Sunday, February 8, 2015

E's Third Birthday Party Part 1 - Decorations

At the end of last month we celebrated E's third birthday with a Monster-ous Birthday Party.

The whole theme of this party began several years ago when Toys R Us was discontinuing their line of Ugly Dolls. They had several of the small clip-on dolls left that were cute so I picked up four with the hopes that at some point I could convince one of the girls to have a monster party.

The tricky thing about this party is that we had been out of town for several days leading up to it so I didn't have the usual amount of time to get ready for it. The vacation was worth it though! :)

The decoration that took up the most time was a child-sized monster cut-out I tweaked from the BHG website. Since I didn't want to pay for a full color print of the monster I decided I would draw and paint my own. Now mind you, I'm *NOT* an artist so my first step was to draw a one inch by one inch grid on my foam-core boards. (I needed one and half boards in order to make the mouth opening right at E's face height.) When that was finished I opened my monster image in Photoshop and turned on the grid lines so I could begin drawing.

Here it is all drawn in pencil. (I used the triangular pieces next to it on the back to help it stand.) The next step was to erase all my grid lines before painting (except for in the mouth since that part will be cut out.)

Here it is in the painting stage. Thankfully the blue covered really well and I only needed one coat. The light pink covered great too but the dark pink needed two coats.

I used a black Sharpie to outline everything and an Exacto knife to cut out the mouth. When it was finished I used packing tape on the pack to attach the head to the body and the triangular pieces so it would stand. I also taped two long, thin sticks on the back to keep the separate top piece from flopping forward.

Here is the birthday girl enjoying all of Momma's hard work:

Big sister got in on the fun as well:

For the tables I made centerpieces using some cute monsters from two books that both of our girls have enjoyed over the years; Grumpy Frumpy, Happy Snappy and One Oogly Eye. I photographed the monsters I liked, imported them into Photoshop, and recreated them digitally. I attached them and a number 3 to lollipop sticks and stuck them in a styrofoam block surrounded by a feather boa. I wish I had time to cut the monsters out properly but unfortunately I didn't. We used three of the girls Yo Gabba Gabba beanies and I made rainbow pom-pom monsters. I also purchased some cute monster flannel fabric from JoAnn Fabric and used it as tablecloths.

Awhile back, probably around Halloween a few years ago, I found these monster vinyl stickers. The only problem with them is that they weren't precut or anything. It was just one solid sheet of vinyl with 10 monsters printed on it. It didn't take me too long to cut them all out and they looked great on the windows.

Lastly, I made monster feet and a visor for each of the girls. The feet are made from 9"x12" glitter foam sheets and the visors are foam with faux fur and googly eyes. (It's hard to see in the photo that there's an opening for the kids to slip their feet into the monster ones.)

Well that's it for the decorations portion. I'll be back with another installment showcasing the food, cake, gifts, and treat bags.

Have a great night!