Friday, October 12, 2012

Cloth baby wipes

Happy Friday! I hope you have a fun weekend and spend a ton of time with your families and/or friends!

Back in July I mentioned wanting to use reusable cloth wipes as a part of our cloth diaper routine. Originally I wanted to make my own but it ended up being a much bigger pain in the behind than it was to just purchase some baby washcloths. I bought a 12-pack of 100% cotton 9"x9" Carters brand for $3.99 from Marshalls, a 12-pack of 75% cotton / 25% polyester 9"x9" Luvable Friends brand for $3.99 from Ross, and a 10-pack of 75% cotton / 25% polyester 10"x10" Cutie Pie brand for $3.99 (I'm not sure if it was from Ross or Marshalls.) This seems to be a more economical route than purchasing specifically branded reusable cloth baby wipes.

So far these have worked out great. They all have a smooth side and a terry cloth side. The smooth side is great for cleaning up pee-pee only or wiping a messy face and the terry cloth side is good for gripping and wiping up poop. The cool thing about using cloth wipes is that I only have to use one (or maybe two if it's particularly messy) per diaper change compared to the 5 or 6 per messy change when I was using disposable wipes. These clean up the same way as the cloth diapers and can be washed in the same loads as the diapers.

One of the neat things I learned online while doing research about cloth wipes is that they can be folded in such a way that you can use them in a pop-up wipes dispenser. There might be YouTube videos of how to do this but I have a few photos showing how and once you try it, it's very easy.

I've chosen 4 different colors to help visually see how to fold them. The colors
are, from top: light blue, green, dark blue, white. I'm using the 9"x9" size because
they fit into a standard size disposable wipes container a bit better.

Lay down the light blue wipe.
Lay the green wipe on top of it so it's overlapping the light blue wipe by half.

Fold the light blue wipe over the top of the green wipe where it overlaps.

Lay the dark blue wipe on top of the light blue wipe that was just folded in half.

Fold the green wipe over the dark blue wipe.

Lay the white wipe on top of the green wipe you just folded in half.

Fold the dark blue wipe over the white wipe.
Continue adding wipes until you've folded them all together.

Stick your cloth baby wipes into your adorable Winnie-the-Pooh disposable
wipes container.

Here you can see that when I pull out the top wipe, the one below it comes up too,
just like traditional pop-up wipes.


There are a ton of cloth wipe solution recipes on the internet. I looked at quit a few of them and ended up going with Baby Bum Drops by Knickernappies. They are tiny cubes that you dissolve in hot water and pour or spray on your wipes. When I make a batch I pour 3/4 cup of boiling water into a Thermos, drop in a cube (or sometimes a half of a cube if it's a bit bigger) and then fill it the rest of the way with filtered water from the refrigerator. The Thermos keeps it warm the whole day and that amount will typically last me two and a half days using my current dispensing system, which is kind of wasteful. I pour the solution onto a wipe over the sink and then wring it out a bit. I used to pour it out over a Rubbermaid container and then dump the extra back into the Thermos but I've gotten lazy. I need to start doing that again.

The Baby Bum Drops are safe to use with
cloth diapers and cost approximately $13.99
for 50 of the little blocks.
**ADDITIONAL INFORMATION**
Here is a link discussing our switch to cloth diapers.
Here is a link with information about our cloth diapering experience.
Here is a link to a comparison between the BumGenius 4.0 One-Size Pocket diapers and the FuzziBunz One-Size Elite Pocket Diapers

Thursday, October 11, 2012

She's Ready For Her Close-Up

Every year we take K to the JCPenney Portrait Studio to document another birthday. For her three-year photos I was over a half year late in getting them taken so technically she's had two sets of yearly pictures taken this year. I'm actually really surprised that there's as much of a visible change with these pictures given how close together they were taken (7 months apart). I love seeing the progression of time in how her looks change.

And speaking of these types of photos, from any other moms who do this type of thing, have you given it any thought on how long you'll do them? Originally I was thinking until K starts kindergarten and then has school pictures taken. But these are always so much more fun so then I was thinking until she turns ten. Why ten, I have no idea. What do you all think?

For comparison, here is one from year two and year three. Click on the links if you want to see all of the pictures from those years:

Year Two


Year Three


Year Four


We have also had a picture of her taken with the number of her age each year but the photographer told me they only go up to five so I guess if we keep this up I'll have to start bringing my own numbers.


Also, it just so happened that we were at the store on the last day that they were doing an event which happened to be mermaids and pirates. Obviously they were gearing the mermaids to girls and pirates to boys and while I was secretly hoping K would pick pirate, when given the choice, she chose mermaid. We even go Little Sis in on the action. This is our homage to Daddy and his love of the beach:


Since the side pictures above are so small, here is each one blown up. The bottom one cracks me up. It's supposed to represent K being caught and the look on her face just kills me!


Now I just have to make sure I get E to her one-year pictures on time ;)

Monday, October 8, 2012

K's 4th Birthday Party - Alice In Wonderland; Gifts

Part 5


Hooray! I'm finally going to wrap up K's 4th birthday party! This last post is all about the loot; hers and the take home goodie bags. I honestly have as much fun finding appropriately themed goodie prizes as I do with all of the other aspects of the party.


JAKE family photo.


This year K was very interested in examining each gift as she opened it. She was a bit slow to warm up to having everyone staring at her as she opened them but by the end she was hamming it up as usual.


For Goodie Bags this year I ended up using gift bags bought at the Dollar Tree. The gifts I had were too big for the usual cute-sy type of boxes or bags so I had to go big this year. I made a "Take Me" label that matched the "Drink Me", "Eat Me", and "Guess Me" labels and taped that to the front. I let K pick out the colors and of course she went with blue. They only had two blue ones left though so we had to get a silver one too.


Inside the bags were an Alice in Wonderland coloring book, a box of 8 Disney Princess crayons, a personalized bookmark from the Bride in Wonderland download, an Alice in Wonderland book with a personalized book plate from the Disney Family website, a set of the Talking Flowers in a striped goblet, and a twisty straw. I was very happy to have found the book and coloring book because Alice isn't a princess so she is rather hard to find when looking in the Disney section at most stores. The coloring books were also from the Dollar Tree so that was a super sweet score!


I had the bookmarks in each of the books on the page with the Mad Hatter at the Un-birthday party. While I doubt any of the kids noticed, it was just a little touch that made me smile. Beside, that was the image for the inspiration for the invitation I made.


I found a great, high resolution image of Alice and the Mad Hatter with the cake on his head on Google Images and then looked up a few quotes for the movie, added the pertinent information with a colorful background and the invitations were done. These were pretty easy compared to the last few years and while they aren't as memorable as the Toy Story ones from last year or the cupcake ones from her first birthday, I still think they turned out nicely. (In case you're wondering, I bought Mickey Mouse ones for her second birthday.)


So that finally wraps it all up. I can't promise I won't include as many pictures / posts for future birthday parties but I'll try and be more timely about them. I still have tons of photos from the summer I want to post and here it is already Fall! Maybe one day I'll catch up...

Part 1 - Decorations
Part 2 - More decorations
Part 3 - The cake
Part 4 - Food

Tuesday, October 2, 2012

K's 4th Birthday Party - Alice In Wonderland; Food

Part 4


Hopefully you're not sick of hearing about this party (yet). I only have one more post after this one and that will wrap it all up. Tonight I'm covering food, more decorations, and Little Sis.

The party started at noon so I knew we'd want to have some actual food and not just desserts. We served barbecue meatballs, pasta salad, Hawaiian salad and three kinds of deli spirals. In the picture below you can see the Birthday Banner I downloaded from the website In Good Company. They have an amazing free download called Bride In Wonderland that includes the full alphabet buntings as seen below (I had to really darken up my picture to see the banner because my flashed washed them out so much). I also used their food picks and bookmarks which you will see a bit later in this post. I love it when such talented designers let you use their creations for free. So awesome!

Also in the picture you can see my food tent cards. They are quite literally playing cards and all I did was print out the name of the food in a border that I had printed and taped onto the backs of the cards with double sided tape. In keeping with the theme of the Card Guards and K's fourth birthday, each food tent card has a red and a black 4 in two corners and two suits from the playing cards. I stood them up using clothes pins. They looked pretty cute (there's a close up of one in the post about the cake) but were kind of pointless so I probably won't do food tent cards at any other party.


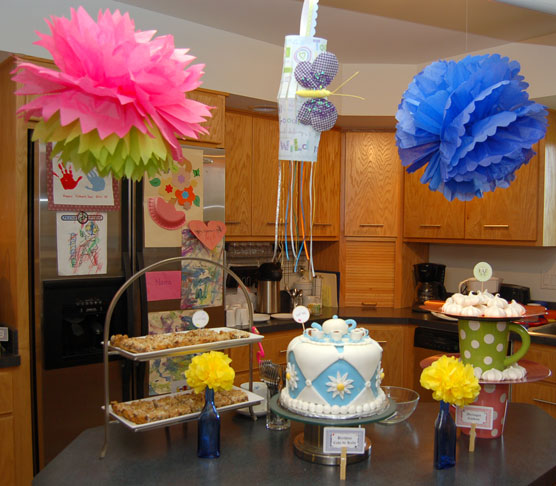
Below is the dessert bar. The cake is obviously the main highlight but there are several other details I would like to share. The two tissue paper flowers are from a Martha Stewart tutorial. Mine turned out kind of wonky. Maybe I did them wrong... In the center is the paper lantern K made. She really wanted to help with the party decorations and I was happy to let her. She also helped me make the smaller yellow poms in the blue vases. Those turned out a lot cuter. I also want to point out the jumbo polka-dot teacups. I found those on clearance at Michael's along with the two charger plates. They looked super cute stacked and filled with meringue cookies. We also had one of my favorite desserts, Seven Layer Bars - yum!


Unfortunately, in the photo above you can't see the super cute flamingo pencil on loan from my Mom for the Guess Me Jar. (In case you don't remember the flamingo reference, Alice plays croquet against the Queen of Hearts using flamingos as the mallets and a hedgehog for the ball.) Mom and I filled a jar with jelly beans and had people guess how many were in it. The closest guess won. Everyone except for my grandpa and brother guessed way low with my brother being closer so he got to take home the prize.


The drink bar was a fun space to decorate. As you can see, there are two more of my tissue paper poms. These turned out a little bit better. Aside from the usual stash of soda pop, I made a raspberry lemonade punch from a Martha recipe and it was super easy and very tasty. I also had iced tea since part of the theme of the whole party was a tea party, and mini bottles of water that I covered with Drink Me labels. In the back you can see my flamingos and hedgehog (see the note about their significance to the movie above.)


These straw toppers are from the Bride in Wonderland
download I mentioned above with the birthday banner.


And last, we can't forget Little Sis. E had her own special wardrobe for the occasion. The funniest part about her outfit is I bought this pack of Alice onesies before she was even born. I have ideas for each of the girls birthday parties planned out for the next, oh... 6 or 7 years. Now that doesn't necessarily mean that I will end up doing them all but what it does mean is that when I see something that will work in the dollar section at Target or the perfect shirt, I'm going to buy it. I have a big plastic storage container that I stock with party supplies for future parties. I know, I'm crazy. Get over it ;)


She even had a wardrobe change for bedtime.

Part 1 - Decorations
Part 2 - More decorations
Part 3 - The cake
Part 5 - Gifts & Goodie bags

Monday, September 24, 2012

K's 4th Birthday Party - Alice in Wonderland; The cake

Part 3


Hi! Welcome to part 3 of K's Alice In Wonderland 4th birthday party. In case you've missed any of it I've covered decorations here and here. Today I'll be showing off her amazing cake. Our cousin (or Auntie Cousin as we like to call her) is an incredibly talented cake decorator. I wish she had a website to showcase all of the cakes she's made but unfortunately she doesn't. Maybe make a Flickr page or something, Auntie Cousin so we can show you off?

Well, until that happens, you will have to trust me on the other cakes based on this beautiful creation she made for K. It started with this photo I found on the internet. Originally I thought I wanted a topsy turvy cake with three layers but based on the number of people we had invited, it seemed like that would be way more cake than we'd need. I showed three pictures of cakes to K and let her pick her favorite. She chose this one because she liked the blue and the flowers. I sent the photo to Auntie Cousin and asked her if she could do it but just the bottom blue layer. Originally I had intended to use an actual teacup on the top but Auntie Cousin came up with her own amazing idea and I like it so much better.

The day before the party, Auntie Cousin's power went out and was out for basically the entire day. She ended up coming over to our house to make the cake here. Thankfully by the time she was ready to decorate their power came back on and she went home to finish. We made her promise though that she wouldn't be up until all hours in the night decorating and I'm happy to report she listened!

So, without further ado, the CAKE:
Can you tell she likes it?

Isn't it beautiful?!?

Can you believe she made the teapot and cups???

She was so happy listening to everyone sing to her.

Make a wish!

She was so happy to have a 4 candle on her cake.

You can see the layers of fondant and how much time went into the cake.

Auntie Cousin added sprinkles in the layers of frosting between the cake.

K was so excited about her cake and who can blame her?!? It was beautiful and tasted amazing. We are so blessed to have so many talented family members and friends who so graciously donate their time and talents to us and we are so grateful!  We love you all!

Part 1 - Decorations
Part 2 - More decorations
Part 4 - Food
Part 5 - Gifts & Goodie bags

Saturday, September 15, 2012

K's 4th Birthday Party - Alice in Wonderland; More decorations

Part 2


I'm finally getting the chance to continue with K's 4th birthday party pictures. As you may recall from my last post we had an Alice in Wonderland theme. The last post focused on the table decorations. In today's post I'll show you a few of the decorations around the house and some pictures of the birthday girl herself.

I took my inspiration from the Disney cartoon version of Alice in Wonderland. Below is a picture of the inside of the front door. I had originally wanted this display to be on the outside of the door but it was raining pretty heavily that day and although the door is protected, I didn't want to risk it getting wet. While the original doorknob has a traditional round "nose", all of the doors at my parents house have these lever-type handles so ours just had a really long nose. I downloaded the talking doorknob template from the DisneyFamily.com website and instead of crafting my own from construction paper, etc. like they did, I opened the template in PhotoShop and reconstructed it piece by piece into one file that I had printed on cardstock at OfficeMax.


On the table is an empty Captain Morgan's Private Stock rum bottle with a "Drink Me" label that I made and a cool skeleton key my Mom has on a ring as decoration in their house.

K wanted to pose with the key by the door so here you get to see her in her Alice dress that my Mom made. I tried helping and did part of it but between both kids, I barely had 10 minutes per night to work on it so thankfully Mom stepped it as our hero and basically made the whole thing. All hail Mom!


Turning away from the front door (basically opposite it) is a coat closet and the hallway to the rest of the house (and a bathroom and office but those are not part of the decoration so I'm leaving them out.) There is a very small space of wall between the coat closet and the hallway and that turned out to be the perfect spot to hang my Directional Arrows. In the movie Alice is trying to find the White Rabbit and comes across an area where there are directional signs pointing every which way. She also runs into the Cheshire Cat who tells her to ask the Mad Hatter or the March Hare. Originally I was trying to figure out how to make a tree in order to stick my arrows on but when I realized this sliver of wall was there, it worked out perfectly!


The Cheshire cat is actually made up of four pieces of cardstock taped together because I wanted him to be really big. I found a black and white image of him online and blew it up in PhotoShop and colored it in and then had it printed at OfficeMax. The arrows were also found online and I added the text and had them printed. They say, "Up/Down, Over/Under, This Way/That Way, Yonder/Beyond". There is one additional one in the middle. Can you read what it says?


In another area of the house was my White Rabbit display. K has a LOT of stuffed rabbits but surprisingly, none of them are plain white. I decided to go with my Mom's ceramic one because I really like it and it went well with the theme. The pocket watch was on loan from my Dad (it was his grandfather's) and the white gloves are from a craft project I want to do but still have never gotten around to making.


I was a little worried about this display with the kids but thankfully the rabbit wasn't broken and no one touched the watch.


During the party I had the movie, Alice in Wonderland, playing quietly for the kids to watch. I think K and her cousin A watched it for approximately 30 minutes but it was fun to look up and see tidbits of it now and then.

To the left of the TV are four frames that contain rotating "art". My Dad still has an enormous record collection (as in vinyl for those youngsters reading this). For every holiday we challenge him to come up with four records that represent said holiday. It's not always easy since he hasn't bought a new record in I don't even know how many years but somehow, we all brainstorm and manage to come up with something. For K's 4th birthday he had, "Jefferson Airplane: Flight Log" which contains the song, "White Rabbit". Below that is "Led Zeppelin: IV", "Eric Clapton: 461 Ocean Boulevard", and "Dennis Yost and the Classics IV: Golden Greats Volume 1".


A lot of the Alice in Wonderland parties I found online revolved around the Tea Party scene of the movie. While I loved this idea I was a bit worried about using the beautiful white and blue china tea cups from my Mom's great grandmother with the girls. I decided to use just one as a topper on the cake but oh, wait until you see what ended up on top of the cake. SOOO cute! Instead, I used it as a prop for a picture of K:


Part 1 - Decorations
Part 3 - The cake
Part 4 - Food
Part 5 - Gifts & Goodie bags