Showing posts with label baby. Show all posts

Saturday, December 14, 2013

Faux Chenille Baby Blanket

Ten days ago my best friends had their first baby, a gorgeous baby girl. I wanted to make something for her so when I saw the tutorial on Made for a faux chenille blanket, I knew that was it. I actually ended up using the Aesthetic Nest tutorial Dana on Made references because I liked the idea of using flannel for the back instead of just cotton making it nice and cozy for a winter baby.

While this is a (very) time consuming project, it's actually quite easy since all you have to do is sew straight lines so if you have a few hours on your hands (or days if you need to break it up like I did) then I highly recommend making one of these for a loved one. K already picked out the fabric she wants for hers and I helped E pick out hers. But, they're going to have to wait until AFTER Christmas!

Supplies


1 1/4 yards cotton fabric (this will be for the top of your blanket)
1 1/4 yards each of THREE coordinating cotton flannels (I used 100% cotton for all fabric)
Kitchen twine (the kind you tie around a pot roast)
Disappearing ink fabric marker
Yard stick
At least two spools of thread of a color that will show on the top of the blanket
2 packages of double fold bias tape
1 spool of thread to match the bias tape
Fabric scissors, or even better, a slash cutter (sometimes called a chenille cutter). I got mine from JoAnn Fabric using a 40% off coupon. I highly recommend it.

Steps


1. Lay out the top fabric and measure 45" square. Cut off any excess.

2. Use the cut piece of fabric as a guide to cut your pieces of flannel.

3. Using a piece of the kitchen twine, stretch it across on the DIAGONAL. This blanket will only work if you sew and cut it on the bias, which means the diagonal. Then, use the yard stick (or other long straight edge) and the disappearing fabric marker to trace that line.

3A. OPTIONAL: You can pin your blanket around the edges or use a few safety pins in the middle. I didn't pin mine at all because the layers of flannel keep it from shifting too much.

4. Sew straight down the line you drew. Continue sewing straight lines 1/2" apart. For the most part I just eye-balled the 1/2" spacing but occasionally if I felt my lines were getting too wonky, I would lay the blanket out on the floor and use a ruler to draw a line or two until they were straight again.
You can see my first 6 lines under K's hand.

5. Keep sewing straight lines. And sewing... and sewing... I started at the center and sewed one whole side. Then I spun the blanket around and sewed the other side. It's a bit ungainly because of the weight of 4 layers of fabric so I had to keep folding mine up so it would be easier to handle.

6. Cut off any excess flannel that might have shifted during sewing. Leave the top fabric though - it helps with the cutting in the next step.


7. Lay your blanket face down (flannel side facing up) and using your slash cutter or scissors, cut right down the center of each row you stitched - FLANNEL ONLY! Don't cut through your top fabric.

8. Spread the blanket out on a hard flat surface and using your ruler as a guide, square up each side and corner. This is much easier done with a rotary cutter and self-healing mat but it isn't absolutely necessary. (I found this step to be a pain in the bum and had to keep trimming off a little more, and a little more until I got it nice and square. It's important to have nice straight edges for the binding in the next step.)

9. Line up the binding so that the edge of your blanket is sandwiched in between the binding. I made mine with the edge all the way inside the binding so that I wouldn't miss any layers as I sewed.

10. And now the fun part - Washing the blanket! Throw the blanket in the washer and dryer and watch those cut rows of flannel turn into soft, fuzzy faux chenille.

Here's a comparison:
Before
After

Both girls loved the blanket and anytime I had it out on the floor to cut or measure they were all over it. Here's E enjoying the final results. She loved running her fingers in between the rows of wiggly flannel.

I hope Baby F will enjoy her new blanket as she gets a bit older and her Mommy and Daddy will tell her all about her crazy Faux Auntie who already loves her and can't wait to meet her.

Sunday, August 11, 2013

The "Other" Baby Essentials: part 2

Did you know that it was World Breastfeeding Week 2013 this past week and August is National Breastfeeding Awareness Month? Yeah, me neither. But in light of their whole, "I support you" campaign focusing on supporting all mothers no matter how they feed their children, I figured this was a good time for my next installment of Other Baby Essentials since it's all about items I used to help make breastfeeding easier for me and my child.

1) A nursing pillow - Newborn babies are so tiny and weigh so little, until you spend long nursing sessions holding them in your arms, trying to jockey the baby around into the right position. That's where a good nursing pillow comes in handy. The pillow I heard of and saw most at retail shops is the Boppy. My sister-in-law let me borrow hers when K was a baby and it was never quite right for me. The problem with it for me is that it slipped down too far on my waist to keep K in the right spot for breastfeeding. (*Update: Boppy has updated their nursing pillows and they now come with an adjustable strap and feature a firm side for nursing and a soft side for snuggling. I think this is a huge improvement and I'm glad they worked with lactation consultants to improve their product.) After some research online I came across the My Brest Friend nursing pillow. I love this pillow! It has a highly adjustable strap that wraps around your waist (or ribcage, like I did) and really holds the pillow right where you need it. When E was little I used to carry her around on that thing (holding onto her of course so she wouldn't roll off) when she would fall asleep after nursing. That's how well it stayed in place. The pillow itself is firm enough to keep the baby in the correct position but comfortable enough that she often fell asleep on it. Plus it offers a higher back for better support and a pocket to store smaller items.
It comes in other cuter fabrics but this is the one I have

2) A comfortable nursing bra - Here's the scoop - I can't stand underwire. It always seems to dig in or jab me in the armpit but wire-free bras tend to not offer enough support. Like with most things I buy, I turned to the internet to read reviews on basically every nursing bra that's available. I came up with the Bravado Body Silk Seamless Nursing Bra and let me tell you, it's SO comfortable. The cup comes all of the way down which is good for achieving the correct latch, especially in the beginning when you're just trying to figure that out. The fabric is stretchy enough to allow for growth but supportive enough to be comfortable.
I like it so much I have it in 4 different colors

3) Nursing pajamas - In the beginning, when you're feeling sleep deprived and you're up nursing (again), a convenient nursing pajama top is really nice to have instead of fussing with a baggy t-shirt that just ends up getting in the way for you and your baby. I have a few different tops and nightgowns and no particular brand is really any better than another so long as you find one that fits comfortably and is convenient for you.

4) Somewhere comfortable to sit - I've nursed our baby in pretty much any place you can think of but my favorite place is in the girls darkened bedroom sitting in our hand-me-down rocker / recliner from my Grandma. It's highly padded in all of the right spots and it's super comfortable which is great because we all spend a lot of time in it. I use it mostly for breastfeeding E, A uses it when he's putting her to sleep, and K loves to read books in it. I know a bigger chair like ours may seem overwhelming in a nursery, especially if it's a smaller room to begin with and you have to fit a crib and changing area in there as well, but I'm so glad we have our rocker because it gets a ton of use on a daily basis.
This isn't our exact chair but it's similar

5) Nursing cover-up - In the beginning stages of nursing, particularly in public or when guests were over, I used a cover up. I think a cover up makes nursing in public a lot more comfortable for "the other guy", even more so than it may for the mother. I'm incredibly thankful to say that I've never been subjected to any negativity or criticisms toward my nursing in public. Maybe that's because I do try and maintain a certain level of modesty, but it may also be that nursing in public is becoming more common and accepted. Plus, using a cover up can help your baby nurse better because it blocks out all of the other distractions that might be drawing her attention away from the business at hand (or mouth, as the situation may be). The great thing about the particular cover up I have is that it has a RigiFlex neck which means it stands out away from your body so you can look down and see your baby but it's still flexible enough to fold up. Also, with the way the strap attached around your neck, your little one can pull it off when she gets a little older and wants to see everything that's happening around her. And as a bonus, a nursing cover up acts as a great lightweight blanket if you happen to be out and need one but forgot to pack one in your already full diaper bag.
This is the one I have and I love the pattern


6) Lightweight cardigan - I love these lightweight swing cardigans from Meijer (so much so that I have 3 and am looking to buy at least one more). On our recent plane ride to the Pacific Northwest, I wore one of these and was able to use it as a nursing cover up, a blanket for E, and a great layering piece for myself. A lightweight cardigan is so versatile and can really extend your wardrobe into the cooler months. The great thing about wearing something like this is if your diaper bag really is too crowded you can still nurse in public and be completely covered up by just taking it off and draping it over your shoulder and the baby.

I would like to wrap up this post by echoing the World Breastfeeding Week's theme of "I support you". Before K was born, A and I talked about the fact that I really wanted to breastfeed. Unfortunately, I was unable to breastfeed K and I felt like such a failure as a mother. It was the support from my husband who told me that it was more important for K to be eating and healthy than it was for me to be so hard on myself because things weren't going according to my "plan". Before E was born, I stocked up on formula because I didn't want to find myself in the position (again) of wanting to breastfeed but not being able to and being completely unprepared to offer an alternative option. Call it Murphy's Law but E has been exclusively breastfed from day 1. But even though I used different methods of feeding my babies, they are both healthy, happy, intelligent, wonderful little girls. I support you, moms out there, doing the best you can for your children and for yourselves, and I thank you for your support while I do the best I can.

Monday, August 5, 2013

The "Other" Baby Essentials: part 1

Anyone who has had a baby (or has shopped for a baby) knows that the amount of "stuff" you can buy for your baby can be extremely overwhelming. And many of us have bought or been gifted things that seemed like great ideas but then are never used. There are few things more frustrating than spending hard earned cash on things that add to the already mounting pile of clutter. So that's why I'm going to do a two part blog post about a few items that I felt were truly essential. (I'm calling this the "Other" Essentials because obviously things like a safe place for the baby to sleep, diapers (consider using cloth!), a car seat, perhaps a portable crib are more of the truly essential items.)

1) A diaper bag - When you first start going out with your little one, you're going to want to bring extra diapers, wipes, maybe a bottle and formula (depending on your feeding preferences), a change of clothes, maybe a pacifier... you get my point. And then when they get older, the kind of stuff changes but somehow the amount doesn't seem to get any less. I would highly recommend trying out a few different kinds of diaper bags before settling on the one you like. I got the diaper bag I've used for the past 5 years and through two kids from a second hand store. Honestly, I don't even like the looks of it but over the years I've bought other cuter diaper bags (I kept the tags on them) and did a side by side comparison as to the amount of "stuff" that I can get in and I always come back to my original. We travel to see family and friends on a fairly regular basis so I need to be able to pack a lot of diapers and wipes, snacks, sippy cups, bibs, books, games, sometimes a portable DVD player in mine so my situation may be a bit different than yours. But since you'll be using this bag on a daily basis, it doesn't hurt to purchase a few, fill them up with the stuff you think you'd most likely use, and see how it all fits. Just remember to keep your receipts!
My ugly, second hand diaper bag (by Andy B)

2) Rear facing mirror for the car - When your baby is still young he or she will need to be in a rear-facing car seat and being able to see your baby while driving or riding can be very reassuring. We've had three different mirrors between the two kids and quite frankly, most of them aren't very good - the reflective surface is all wavy like those Fun House mirrors and they aren't very easy to adjust. However, the Diono mirror we got for E is awesome! The reflective surface is amazing (just like a normal mirror) and it's incredibly adjustable. Plus, it seems like you could install it in any kind of car.
Baby mirror in action (and the reflection really is that clear)

3) Winter Bunting - If you have a baby (or a young child) in the winter months like we did, a warm bunting comes in really handy. A bunting is basically a snowsuit for babies but it has a hood, hand covers, and foot covers all attached so you don't have to scramble around trying to find these accessories as your trying to haul your baby, diaper bag, purse, car keys, cell phone... you get the picture We had a pink version of this one and not only was it super warm and soft, but it looked adorable on E.
I love the feet and the ears on the hood

4) Infant car seat cover - This is another item that is extremely helpful for winter babies. I recommend looking for a car seat cover that you install over the carrier with elastic (like a shower cap) because then you don't have any straps underneath your car seat that could potentially get in the way of the car seat locking into the base. And then easy peasy, you just zip this up around your baby and they'll be nice and warm without the extra bulk of a winter coat that could interfere with the seat belts being tight enough. Two things I really like about these covers is that they are water resistant with a fleece lining, and there is a space for their head to poke out but can be zipped closed if needed. It looks like the main difference between the Deluxe version and the Arctic version is the Arctic version has an attached blanket for swaddling around the baby inside the carrier.
Staying warm in style


Monday, June 3, 2013

Let's Review... Travel Strollers

Hello. It's time again for another product review. This time I'll be discussing what I feel are the strengths and weakness of three different lightweight travel strollers we own, focusing on three points: weight capacity, total weight, and maneuverability. Since we'll be using one of these strollers on our up-coming vacation with our older daughter, these three points are the most important to us. As I've mentioned before, I don't get any kick-backs or free products from these companies. My reviews are solely to help other parents out there when deciding which baby products to spend their hard earned money on.

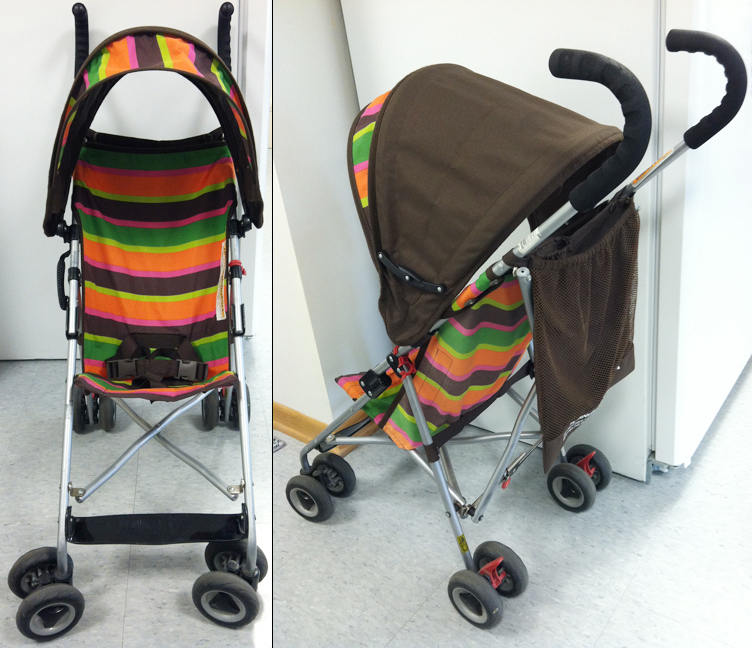
First up is the Babies R Us Lightweight Stroller. This is an umbrella-type stroller with a few upgrades and at $30.00 it's the cheapest of the three travel strollers in this review.


According to the statistics on their website, this strollers weight capacity is 35 lbs and its total weight is 6.5 lbs. Our older daughter, K, is heavier than the suggested 35 pounds however we still use this stroller with her in a pinch. Because she's heavier that their suggestion the maneuverability of this stroller suffers. However at a total weight of only 6.5 pounds, this is the lightest stroller making it easiest to carry around for travel purposes.


Next up is the Jeep Cherokee Lightweight Sport Stroller. The exact model that we have is no longer for sale so this is the link for the new version: Jeep Cherokee Sport Stroller. My review here will be of the model that's no longer available since that's the one we own. At $50.00 this is the middle of the line for price.


According to the statistics on the website, this strollers weight capacity is 40 lbs and its total weight is 11.8 lbs. One of the updates from our model to the current one is that the weight capacity has gone up to 50 pounds. If that had been the case with this stroller it would have been my winner. However, at only a 40 lb top limit this impairs its maneuverability enough to rank it second in my review. At 11.8 pounds this stroller still feels very light to carry which is important when considering travel.


Last up is The First Years Ignite Stroller. Coming in at $57.00 it's the most expensive of the lightweight strollers in this review, however it's the one we decided we'll be taking with on our vacation.


According to the statistics on the website, this strollers weight capacity is 50 lbs and its total weight is 17.5 lbs. While 17.5 pounds doesn't sound like a lot, this stroller seems surprisingly heavy to me given its small footprint which is the one downfall I have found so far. I'm not sure if it's the higher weight capacity or something about the wheels but this stroller is a DREAM to maneuver, even with our older daughter in it.


Speaking of footprint, each of these strollers fold up to a fairly small size with the Babies R Us Lightweight Stroller being the smallest overall. The Jeep Cherokee Lightweight Sport Stroller is the shortest but also a bit wider and The First Years Ignite Stroller is the tallest and a bit wider than the Babies R Us stroller with its larger wheels. This is relevant when deciding which stroller will fit in the back of an already tight trunk stuffed with luggage as well as gate checking it at the airport.

I could have cropped this closer but the baby butt is too cute to cut out.

Each of these strollers have some additional "bonuses" that while they aren't absolutely necessary, they are definitely nice to have.

The Babies R Us Lightweight Stroller has an adjustable canopy which is great for blocking out sun when it's in any position other than straight up. It also comes with a small removable storage pocket for diapers, wipes, toys, a sippy cup, etc. There's an even smaller pocket inside that for keys and a phone.

The Jeep Cherokee Lightweight Sport Stroller has a hard plastic parent console with two cup holders and a small storage space, a removable plastic child tray, a large plastic footrest, a decent sized storage basket underneath that is easy to access, two cargo bags to hold additional items (I don't really get these), and a window in the canopy making it easy to see your child when the canopy is open. The canopy is not adjustable like the Babies R Us version; it's either open or closed. This stroller is very easy to open and close with the one-hand fold design. It also stays upright when folded which is a very nice feature when storing the stroller during its off time.

The First Years Ignite Stroller has a fabric parent console with a drink holder and a small zippered pocket for keys and a phone. Like the Jeep stroller, it has a fixed canopy and a storage basket underneath that is a bit more cumbersome to use due to the frame of the stroller to accommodate the heavier weight capacity. It's also the tallest of the three strollers which is great when you have a tall husband like I do. It's also the only stroller with an adjustable five-point harness. While this isn't as important with our older daughter since I don't plan to buckle her in anyway, it will be very nice when we use it with our younger daughter.

Here you can see how the Babies R Us stroller on the left has an adjustable canopy
(it's pulled down so it's covering the front of the stroller).

As far as fit and comfort go, my daughter says she likes the Jeep stroller best. I don't know if it's really because it's more comfortable or if it's because it's blue (her favorite color). She seems to fit in these two strollers about the same. They have a longer seat which is good for her longer legs, a bit of a higher back which is good since she's tall and they are a bit wider to accommodate an older child. She is really too tall for any of these strollers since her  head extends past the top of the back but I know we are going to be doing a lot of hiking / walking on our vacation and while she can and will do a good part of it, I also know her legs won't last as long as ours and if we want to be able to see all of the sights I have planned, we're going to need a stroller for her. (Thankfully Little Sis is still small enough to carry in our Boba 2G Baby Carrier so we don't have to bring two strollers.)


So, based on the maneuverability, the higher weight capacity, and the taller handles, The First Years Ignite Stroller won out as our travel stroller. I'll do a follow up post about how it worked out "in the field" when we get back from vacation. Honestly though, if I had remembered we had that Jeep stroller in the basement and had not felt how amazing The First Years Ignite stroller maneuvered, I would have saved the money and brought the Jeep stroller; it was a very close second. Like I mentioned before, maybe the higher weight capacity has made the newer Jeep models easier to maneuver and it would win me over.

(P.S. I own two other strollers that I'll review at a later date. And just so you don't think I'm crazy owning so many strollers, the Jeep stroller is my Mom's.)

Friday, April 5, 2013

Let's Review... Baby Carriers

Hello! This is the first of many posts where I will write a review of my experience with something. That "something" may be a product, a movie, or food. I rely heavy on the reviews of others before I purchase something or even sometimes whether I go see a particular movie or to a certain restaurant. Hopefully these reviews will be helpful to you as well and, as always, if you have any questions or need more clarification, please don't hesitate to ask me.

Today I will be reviewing baby carriers. I'm actually going to be doing a comparison of the four different types of carriers that we own and what I see as their strengths and weaknesses. I am including links to each of these products on Amazon in case you are interested in any of these carriers. And for the record, I don't get paid for my reviews or endorsements. I'm just hoping they will be helpful to other moms out there.

A baby carrier is a fantastic item to have for several reasons. Babies love to be held. And most people want to carry a baby. It's a great way to bond with your little one, look them in the eyes, smooch their faces, smell their heads, you get the drift. However, after hours of lugging that sweet little 10, 15, 20 pound baby around, your arms begin to feel like they're going to fall off. Also, there are certain circumstances when a carrier is much more convenient than a stroller. A super crowded museum or aquarium is a great example on when it's a whole lot easier to just maneuver your body around the masses of people than it is a stroller. Plus you never have to worry about losing your baby in a crowd since they are attached to you. It's also great for when your baby is still itty bitty and the sweet, well-intentioned people in the grocery store want to touch your baby and you don't want them putting their hands or faces in your babies face for fear of germs, most people won't do that when you have your baby right up against your chest in a carrier.


First up is the Baby Bjorn Classic. We received this as a hand-me-down from a coworker before K was born so ours is a bit different than the one pictured and in the link. For all intents and purposes though, it works the exact  same. The Bjorn works nicely for young, lightweight babies. It's convenient for travel purposes since it's soft and can be rolled up and stuffed into a diaper bag. It's easy to get your child in and out of and it's nice that you can wear your baby facing toward you when they are very tiny and facing out when they are a bit older. (You cannot wear the child on your back though.) However, when your child gets a bit older / heavier, here is where it fails. I found that carrying a heavier baby in the Bjorn for an extended period of time was very uncomfortable on my back. Also, this carrier is not very ergonomic for your child as there is a great deal of pressure placed on their private bits since the area between their legs is very narrow and all of their weight is resting right on that spot. This is especially significant as your child gets heavier.


The second carrier we used was the Chicco Smart Support Backpack. This carrier is only worn on the back and has an aluminum frame to give it structure. We used this backpack primarily for hiking since it has a sunshade and a more rugged design overall. It comes with a zip-off rain shield, a zippered phone / key pouch, and a little bit bigger pouch for a diaper and a few wipes, etc. that clips on the back (you need someone else to access it or you have to take the carrier off to get into the pouch.) The part that rests against your back is well padded making it pretty comfortable to wear but after a few hours of hiking, it did start to make my shoulders and neck ache. Also, it's not convenient for travel with its rigid frame. I found it to be a nuisance having it take up a bunch of room in our trunk when there are so many other things that I need to have back there, like the double stroller and three cases of wine. Just kidding about that last part - I don't have a double stroller ;)  While it is easy to get your kiddo into and out of this carrier, it isn't the easiest to get it on your back by yourself. I found the best way to do it was to load the kid in it while it's either sitting on a table or on the tailgate of our van and then shimmy it on my back while trying to keep it balanced and then pulling in the kickstand once I had it secure. If the hubs was with me he could hold it up while I slipped the straps on but again, neither method is super easy or, I felt, that safe.
The picture on the left shows it with the kickstand out for easy loading/unloading.
The picture on the right shows it with the kickstand pulled in for walking/hiking, etc.


Next up is the OneStepAhead Zip-N-Go Hip Carrier. This carrier is the ultimate in convenient travel. The whole thing zips up into its own small pouch that you can then throw into your diaper bag or even a purse. And, when you have the carrier on you can then use the pouch to keep your essentials in (keys, phone, diaper.) Plus, it's kind of neat because it carries the baby on your hip instead of your front or back which is a natural place for most people to carry a baby. Unlike the Baby Bjorn that can have your baby facing toward you or away, this carrier only allows the baby to face you. There is a large movable padded section on the shoulder/neck strap that also covers the clip that holds it on. It's easy to get your baby in and out of it on your own and it's quick and easy to put on. This is a good carrier for a baby that is old enough to hold her head up but not so old that she will be flinging herself out of it backwards. This last point is even more important with the model I have since it looks like they have made the back higher than the one I have. I find this carrier to be good for shorter trips like going to the grocery store and your kid wants to be held instead of in the cart but your arms are tired and you still need to be able to get to the food. I was using it for longer, several hour events and I was finding it to really hurt my neck and shoulder and even lower back after that long.


Our fourth, and last, carrier is the Boba 2G Baby Carrier. I *LOVE* this carrier! It can be worn with your baby facing you on your front or your back, it's adjustable for me or the hubs to wear, it's super convenient because it's soft and can be rolled up and stashed in our diaper bag, and most importantly, it's comfortable to wear for long periods of time. Like the last two carriers above, this one is designed for your child's weight to be evenly distributed to their bottom and thighs instead of their sensitive areas making it much for comfortable (and safer) for them as well. It also comes with a sun cover that does triple duty - first as a way to keep the sun off of their heads while out hiking. Second, as nodding head-catch for when your kiddo falls asleep and their head starts bobbing backward. And third, as a cover up for nursing. I've had E on my front and have been able to loosen the straps enough that I can actually nurse her in the carrier and use the sun cover to give us some privacy. I chose to purchase the organic version because inevitably E was going to chew or suck on the straps. Plus, I got a better deal on it since it's a 2G model and they already have a 3G model out with some nice upgrades but nothing that seemed like I couldn't live without to save a few bucks. The only downside to this carrier that I have found so far is that when E was younger I had a REALLY hard time getting her on my back by myself. I'm guessing that now that she's a little older and more able to hang onto me that we can try it again and it will be easier but it was definitely a two person job the few times I tried it. They have YouTube videos online demonstrating how to get your child onto your back so maybe I'll have to try watching those again before we attempt it.
The picture on the left is the front carry (that's the model & color I own.)
The picture on the right is the back carry (that's the 3G model.)


I hope this has been informative / educational / helpful in determining what type of carrier to get for you and your child. Like I mentioned at the beginning of this post, I'm a firm believer in using a baby carrier which is why I'm on our fourth one. Oh, and if it isn't obvious, none of the women, children or man in any of these pictures are us. Just in case you were wondering :)

Tuesday, January 22, 2013

365 Days

For 365 days I've held you in my arms and breathed in the sweet fragrance of your downy little head.

For 365 days I've looked into those big beautiful blue eyes and kissed your soft chubby cheeks.

For 365 days I've watched your jet black hair turn to a golden honey blonde.

For 365 days I've seen the joy in your eyes as you experience the world around you.

For 365 days I've felt a pride I never knew existed as I've watched you and Big Sis learn to play together and see the immeasurable love between you two.

For 365 days I've seen my husband become a father again and I love him more each day.

For 365 days we've fed you, bathed you, clothed you, cuddled you and most of all, loved you.

Happy 1st birthday, our dear sweet Little E.

How old are you, Little E? That's right, you're 1!

Saturday, October 13, 2012

Cloth Diaper Comparison

If you've been keeping up with my blog you know that we use cloth diapers on Little E. I'm very happy with them and it was definitely the right choice for our family. After doing a ton of research online and reading at least 100 reviews on different brands, I ended up purchasing the BumGenius 4.0 One-Size Pocket Diapers. I love them! My only complaint is that they don't come in red. Red seems like it would be such a popular color with Valentine's Day, Christmas, Fourth of July, or your typical summer clothes since they are cute enough to wear under a dress or with just a t-shirt. I decided to look at my local cloth diaper shop to see what other brands make red diapers and came upon the FuzziBunz One Size Elite. They are similar in appearance to my BumGenius 4.0 diapers so I thought I'd give them a try (I bought one red and one brown because I didn't want to have an odd number of diapers. I have this weird thing about odd numbers...) After using the FuzziBunz for a few months now I feel comfortable making a comparison for those of you wondering how they are different.

Inserts


BumGenius on the left, FuzziBunz on the right.
As you can see the BumGenius insert is longer and wider.
It snaps down at two different places to make it shorter
depending on what rise setting you select on the diaper.

Here is the BumGenius snapped down to the middle setting
which is what I'm currently using for E. At this setting the
length is closer to the FuzziBunz.

Left: BumGenius on middle snap, Middle: FuzziBunz,
Right: BabyKicks Joey Bunz Premium hemp inserts - medium size


Diaper Covers


BumGenius 4.0 One Size on left, FuzziBunz One Size Elite on right.

BumGenius snapped on the middle rise setting is the same length as the FuzziBunz.

BumGenius unsnapped (at its longest rise setting) compared to the FuzziBunz.

Now that you've visually seen the comparisons, here are my thoughts on the two. I have long babies. K is very tall for her age and it seems like E is going to follow in her footsteps. My concern with the FuzziBunz is that they fit E great right now but how will they fit when she's 18 months, or two years? I don't think they going to fit throughout her entire diaper-wearing stage. With the BumGenius' three levels of rise and wider circumference, I believe their One-Size will truly be the only size diapers we'll need until E is potty trained.

Size concerns aside, my two biggest complaints about the FuzziBunz are closely related. One of the main selling points of the FuzziBunz is that they are very trim and don't get all bunchy between your baby's legs. While that is true and it is nice when they are smaller babies, the problem with this is it's very difficult (for me) to stuff the insert into the diaper. I have relatively small, thin hands but even for me, I can barely fit my hand inside to get the insert down to the bottom and smoothed out flat. My second complaint is that the inside of their diaper (the plastic part that keeps them from leaking) feels very rubbery which makes the insert stick to it and with the already skinny channel for the insert, it makes stuffing these diapers a big ol' pain in the rear. On the other hand, I can very easily and quickly stuff all 16 of my BumGenius diapers in no time.

Lastly, the FuzziBunz come with a lifetime warranty for certain defects. One of the defects it covers are the snaps and it just so happens I've had one of my snaps break so I'm going to try and take advantage of their warranty policy and get it replaced. Once I see how that goes I'll update this part of the post and let you know. I'm sure like most things, it's all a matter of preference. I happen to prefer my BumGenius 4.0 One-Size Pocket Diapers over the FuzziBunz One-Size Elite but that's just what seems to work best for me and my baby. I'm sure there are an equal number of women who prefer something else. I just hope this helps give a bit more information to those of you looking to make the switch over to cloth diapers.

**ADDITIONAL INFORMATION**
Here is a link discussing our switch to cloth diapers.
Here is a link with information about our cloth diapering experience.
Here is a link about using cloth baby wipes.

Friday, October 12, 2012

Cloth baby wipes

Happy Friday! I hope you have a fun weekend and spend a ton of time with your families and/or friends!

Back in July I mentioned wanting to use reusable cloth wipes as a part of our cloth diaper routine. Originally I wanted to make my own but it ended up being a much bigger pain in the behind than it was to just purchase some baby washcloths. I bought a 12-pack of 100% cotton 9"x9" Carters brand for $3.99 from Marshalls, a 12-pack of 75% cotton / 25% polyester 9"x9" Luvable Friends brand for $3.99 from Ross, and a 10-pack of 75% cotton / 25% polyester 10"x10" Cutie Pie brand for $3.99 (I'm not sure if it was from Ross or Marshalls.) This seems to be a more economical route than purchasing specifically branded reusable cloth baby wipes.

So far these have worked out great. They all have a smooth side and a terry cloth side. The smooth side is great for cleaning up pee-pee only or wiping a messy face and the terry cloth side is good for gripping and wiping up poop. The cool thing about using cloth wipes is that I only have to use one (or maybe two if it's particularly messy) per diaper change compared to the 5 or 6 per messy change when I was using disposable wipes. These clean up the same way as the cloth diapers and can be washed in the same loads as the diapers.

One of the neat things I learned online while doing research about cloth wipes is that they can be folded in such a way that you can use them in a pop-up wipes dispenser. There might be YouTube videos of how to do this but I have a few photos showing how and once you try it, it's very easy.

I've chosen 4 different colors to help visually see how to fold them. The colors
are, from top: light blue, green, dark blue, white. I'm using the 9"x9" size because
they fit into a standard size disposable wipes container a bit better.

Lay down the light blue wipe.
Lay the green wipe on top of it so it's overlapping the light blue wipe by half.

Fold the light blue wipe over the top of the green wipe where it overlaps.

Lay the dark blue wipe on top of the light blue wipe that was just folded in half.

Fold the green wipe over the dark blue wipe.

Lay the white wipe on top of the green wipe you just folded in half.

Fold the dark blue wipe over the white wipe.
Continue adding wipes until you've folded them all together.

Stick your cloth baby wipes into your adorable Winnie-the-Pooh disposable
wipes container.

Here you can see that when I pull out the top wipe, the one below it comes up too,
just like traditional pop-up wipes.


There are a ton of cloth wipe solution recipes on the internet. I looked at quit a few of them and ended up going with Baby Bum Drops by Knickernappies. They are tiny cubes that you dissolve in hot water and pour or spray on your wipes. When I make a batch I pour 3/4 cup of boiling water into a Thermos, drop in a cube (or sometimes a half of a cube if it's a bit bigger) and then fill it the rest of the way with filtered water from the refrigerator. The Thermos keeps it warm the whole day and that amount will typically last me two and a half days using my current dispensing system, which is kind of wasteful. I pour the solution onto a wipe over the sink and then wring it out a bit. I used to pour it out over a Rubbermaid container and then dump the extra back into the Thermos but I've gotten lazy. I need to start doing that again.

The Baby Bum Drops are safe to use with
cloth diapers and cost approximately $13.99
for 50 of the little blocks.
**ADDITIONAL INFORMATION**
Here is a link discussing our switch to cloth diapers.
Here is a link with information about our cloth diapering experience.
Here is a link to a comparison between the BumGenius 4.0 One-Size Pocket diapers and the FuzziBunz One-Size Elite Pocket Diapers

Saturday, July 14, 2012

A little more about cloth diapers

Back in  May I mentioned that we had made the switch from disposable diapers to cloth diapers. Since we've been using them for a few months now I thought it might be helpful to go a little more in depth about how it's going for us.

There is so much information on the web about cloth diapers and which ones are best and how they are impossible to wash and all of the crazy sub-things you need to go with them. Here is a break-down on what we are using and what is working for us.

Diapers: I have 16 BumGenius 4.0 One-Size Pocket Diapers. I tried a few different kinds of diapers and found these to be the best for our needs. They are very similar to disposable diapers in how they are worn and put on. They have a microfiber insert which is tucked inside a pocket that is fleece on the top (the side that faces the baby) and a soft water-resistant shell that is on the outside. The fleece pulls the liquid down and through it to the microfiber insert inside. That way there is no moisture just sitting against baby's skin and causing diaper rash. These particular BumGenius diapers are a one size variety so they have a series of snaps that accommodate the rise (how high it comes up on baby's tummy) and also the fit around the waist.
They come in a variety of cute colors. I have 9 white and 7 colors. I wish they had red :(


Waiting to Wash: I am going with the dry pail approach to storing my dirty diapers before washing them. I am able to go approximately a day and a half to two days before I have to do wash. I chose to do it that way because A) I want to be sure to have a few diapers left on hand when washing so there are some for her to wear while they dry, and B) I don't want to leave them sit in the pail too long between washing for fear of bacteria growing on them. The dry pail I'm using is from Ikea and I really like it. It contains the smell perfectly and is a nice size. It's bigger than I need but it's not too big and will be useful when our diapering days are over. Inside I have a waterproof pail liner from Kanga Care. I definitely recommend having two of these because they take at least 2 days to dry so while one is hanging to dry I can use the other one in the pail. I also have a small wet bag from Planet Wise that I keep in the diaper bag for when we are out.
This pail liner is the Root Beer color. I also have Platinum which is gray.


Washing: Washing cloth diapers is one of the more scary aspects when doing research online. There is the whole repelling issue that seems to be a problem for some people. Repelling is when the diaper won't absorb anymore and the liquid just beads up on top of the fleece lining. This can cause leaks and smell problems. From what I've read repelling is caused by detergent build-up on your diapers. You have to use special laundry "soap" to clean cloth diapers that doesn't contain any additives or brightners. After looking on a few websites that have Cloth Diaper Approved laundry soaps on them, I decided to use Nellie's All Natural Laundry Soda. It seems to be the cheapest for the amount used and it comes in a pretty cute tin container that I can either recycle or use for something else when it's empty. The laundry routine I use is 1) cold pre-soak if there is a poopy diaper, 2) normal wash in hot water, 3) extra rinse in cold. (By the way, there are a ton of websites out there that have suggestions on how to wash your diapers to get rid of the repelling problem if you run into that. It seems to be a more frequent problem with people who have front loading machines. Thankfully we have a top loader.)
K calls it "The Dog Soap" because there is a picture of a dog on top.


Drying: The microfiber inserts can be dried in the washing machine (it usually takes me two cycles to get them all dry) and you can't use any fabric softer or dryer sheets so I use these dryer balls and they seem to keep the inserts nice and fluffy. Usually I'm an adamant "If I can't dry it in the dryer I won't buy it" kind of girl but with these diapers, since I view them as a long term investment, I do actually line dry the outer shells. Normally I hang them on our rack inside but when the weather is nice, I bought a folding rack from The Container Store and clothes pins to put them out in the sun. Speaking of drying them in the sun, that's another way to help insure your diapers won't smell. The sun will bleach out any odors and stains should there be any left. Pretty cool!
You can see the Platinum pail liner on the rack.


Leaks: We had a few leaks in the very beginning with overnight sleeping. I did some research and spoke to a sales person at our local cloth diaper shop and she recommended adding a hemp insert to our diaper for overnight. The hemp goes in underneath the microfiber insert and is slow absorbing. The plan is that the fleece wicks the moisture down into the microfiber (which is fast absorbing) and then if it gets super saturated the hemp is there as a back up. The system works great for us and we've never had a leak since. I bought the BabyKicks Joey Bunz Premium hemp inserts because they are two thin inserts attached in a small spot at the top that I cut apart and just use one in her diaper per night. This way I have 6 inserts for the price of 3 and so far we've only needed to use one per night. If she starts wetting more as she get older I can always double them up again.


Diaper Rash: You can only use Cloth Diaper Approved diaper rash creams. Thankfully we haven't had to use any so far so I haven't done too much research on these yet. I'm pretty prompt about changing E's diaper so any wetness doesn't sit against her skin for too long. The only time I notice she gets a little red is after a poop but when that happens I try and give her a few minutes of nudie-butt time with each diaper change and it seems to clear up in a day or so. It's never really red or painful looking (nothing like the chemical burns K got from Pampers Dry Max) so I haven't had to worry about it yet.

Speaking of poop (because I know you're all wondering how that works) it's not as bad as I thought it would be. If you really don't want to hear about poop, skip this section and just look at the picture of the cute baby below...

If you're still reading, I assume you're curious so here goes. It used to be that I couldn't handle poop. Let's just say I had an easy gag reflex. So much changes when you have your own kid(s) and then again when you decide to use cloth diapers. With a disposable all you have to do is wipe the area clean, fold the dirty diaper into a neat little ball and chuck it into a waste can, preferably outside because those buggers will start to stink after a few hours. With a cloth diaper, you have to take care of the mess yourself. At this point E is still breastfed so her poops are different than a formula fed baby and also a baby who is on solids. Her poop is definitely not solid but she only goes once a week so I only have to clean it once a week, which isn't too bad. I've heard solid poop is fairly easy because you can just shake it off into the toilet, give the diaper a little spray with clean water and you're good to go until wash day. With E's poop, I take the insert out (to be rinsed in a few minutes) and rinse the crap out of the shell in the toilet (ha ha, see that pun I made there?) This can be a bit tedious since I will normally clean the toilet first (I know, I'm just going to be putting poop in it so why clean it first? But really, do I want to put my hands in a dirty toilet? I don't think so!) My mom showed me how to rinse the diaper in the water and then scrub the fleece lining together to get any remaining stains off. I usually do this three times with flushes in between until the diaper is basically free of any stains. Then I do the same thing with the microfiber insert which usually only needs one flush. I'm sure this sounds totally gross to anyone who isn't used to doing it but after the first two times, I've decided it's really not that bad and now I just see it as another step to using cloth diapers.

The last piece to this cloth diaper puzzle is wipes. I want to eliminate store-bought paper wipes and use cloth. I had some extra hooded baby towels that we weren't using so I'm going to try using those. So far I've cut the binding off (the part around the edges so it has a clean line and doesn't fray.) I wanted to take that part off so they will all be uniform in size so I can (hopefully) cross-fold them and put them in a pop-up wipes container. I still need to cut the towels into wipe-size rectangles and then zig-zag stitch around the edges so they won't fray. Maybe I'll get that done tomorrow...

**UPDATE**
Here is a link discussing our switch to cloth diapers.
Here is a link about using cloth baby wipes.
Here is a link to a comparison between the BumGenius 4.0 One-Size Pocket diapers and the FuzziBunz One-Size Elite Pocket Diapers.

To leave you on a high note about cloth diapers, they sure look cute on a little ones booty: