Showing posts with label diy. Show all posts

Friday, December 20, 2019

Foyer Closet Redo in Photos

This is how our foyer looked. There were four doors all opening into this same small space. The closet door (the door on the left) and the garage door (directly perpendicular to it) would bang into each other, so much so that there was a dent from the lock of the garage door in the ball handle of the closet door. It was too much and since I couldn't very well remove the garage door, the front door, or the office door, the closet door it was!

The first thing I did was paint the inside of the closet. It was plain white before and scuffed up like crazy. I used Window Pane from Benjamin Moore. It's a gorgeous color, plus it's in the adjoining office so it ties this area into the one next to it. What you don't realize is that we have nine foot ceilings, this closet is quite small, and it has no light. I was sweating like crazy on our large ladder in the dark trying to paint. Not the most fun.

Here's how it looked after finishing painting and removing the door. Previous owners must have had something hanging over the top of the door that left scuff marks on the top of the frame. There were also recesses where the hinges were attached to the frame as well as a hole for the latch.

I used Plastic Wood Filler from DAP to fill in all of the holes / chiseled areas. It was a bit of a process; filling it in, sanding it down, filling in more... to try and get it even with the existing trim.

Here it is with the trim all flush and painted. It's looking pretty good! The next issue was how to store our shoes. Each of us have several pairs of shoes that I like to keep near the door. I didn't want a huge shoe rack because I also want to hang coats in here.
 
I ended up finding these hooks from IKEA called Tjusig. They can be used for hats, scarves, coats, and shoes! We have three hanging end to end so it looks like one big long line. We have six of these total, three on each side.
Here they are in action. Since the closet has such high ceilings, I needed a small step stool in order to reach the top of the hooks. It was functional at this point but I still needed to hang coats.

It took me so long to decide how I wanted to hang the coats that I ended up changing my mind and found this amazing peel and stick wall vinyl called Arrowhead Peel & Stick NuWallpaper by Wall POPS!. When I tell you this was the most challenging project in this house, I'm not exaggerating. There isn't a single straight corner or wall in this entire closet. And remember how I said it's tiny, and dark, and hot, and tall? I ruined 9 feet of one roll trying to hang this stuff. Eventually I had to ask {A} to hang it for me because I was so frustrated and he's so much more meticulous than I am. I will be forever grateful that he did this for me because I love it so much.

On Thanksgiving day, I cut, hung, and calked the 1x2's. There are no useful studs behind this wall so I used these drywall anchors, E-Z Ancor, that are designed to hold up to 100 pounds each. Then I just screwed the hooks into the boards and they're good to go. These are the hooks I used. I love them, they're beautiful. I also upgraded the stool to this wooden one from Amazon. It's awesome.

And here it is complete with coats. I'm really, really happy with how it turned out. Each hook can hold two or more jackets (there are seven hooks - four on top, three on bottom), there's room for eighteen pairs of shoes, and it looks great too! It wasn't an expensive change or even really all that difficult (except for the wall vinyl) and it's really such a nice improvement. - {J}

Sunday, May 15, 2016

E's 4th Birthday Party

I can't believe I somehow missed covering the incredibly fun party we had for the December Birthdays on my Mom's side of our family (minus one cousin who had moved a few weeks before) and for little E so she could still have a fun party before we moved.

I had wanted to do a fun circus themed party for awhile but I thought that probably it would have been for K's birthday since it's in the summer and then I could have had carnival type games outside. However, since she's older, she has her own ideas about what she wants for her parties.

Usually our parties are around the lunch hour but for this party we had a brunch with amazing homemade crepes made from an old family recipe. Such a good idea!!! I found this great idea from Kid's Birthday Parties on using cut marshmallows to look like popcorn on top of cupcakes.

I found most of the decorations at Target and they were even on clearance too! I had the girls color a few pages out of a Ringling Bros. and Barnum & Baily coloring book I had been holding onto.

I even learned how to make balloon animals for the party. I can only make a dog though. The lips and mustaches on the straws came from Catch My Party and they added a very fun touch. The kids loved playing with them, and by kids, I mean my Grandpa.


I had hot air balloons hanging over the dessert table. The mobile was one I found at Ikea quite awhile back and the paper ones I found on the Sparkle Power blog site.

The treat bags and circus animal headbands were also from Target. Unfortunately we never ended up using the face paint stencils. Bummer!

E loved her cupcakes (what's not to love - marshmallows AND Nana's famous buttercream frosting).

The birthday girl got some help opening her gifts from her lovely big sister, K.


It was a fantastic and memorable day for everyone there. We combined several traditions, had a ton of laughs, and enjoyed the company of some wonderful family before we moved. All in all, I'd say it was a success!

Take care,
~ J

Friday, December 11, 2015

Wine Cork Christmas Ornaments

Howdy! Today I have another great and easy Christmas project that the kids can help make.

I come from a family where we "waste not, want not" and if we can't recycle something, we try to find another way to reuse it. Wine corks is one of those things where we try to find other uses.

My mom has made a wine cork trivet...

and a wine cork serving tray.


My sister-in-law used some to make wine cork reindeer several years back...

and last year it was our turn to use some to make wine cork Christmas Tree ornaments.

There are very few supplies needed. Wine corks (obviously), thin ribbon (we used yellow to match the "star"), green, yellow, and brown acrylic paint, paper plates, hot glue gun, and a serrated knife.


The first step is to enlist two very eager helpers to dip the two ends of the corks in green paint. I poured a small amount of paint in paper plates and let them have at it. Also, if you're having kids do paint projects like this, I highly recommend using an old shower curtain on the floor.

I used two shades of green just to mix things up a bit. At first I thought I would use the two colors per tree but I ended up not liking how that looked and kept each tree one color. (E looks so young here even though it was only last year and K's hair has grown a TON since then!)

After the girls dipped each cork in the green, brown or yellow paint, I decided that whole corks would be too big for an ornament so I used a serrated knife to cut them in half. Unfortunately that meant that I had to re-dip the cut sides but it goes really fast so I wasn't too worried about it.

To assemble the ornaments I used hot glue and started from the bottom. Before gluing the top star on I wrapped a short piece of ribbon around it and then hot glued it to the top before tying it in a knot.
Before giving these to the grandparents and teachers, I wrote the year on the star in permanent marker and the girls' names on the back.

If I have time this year I want to make these tabletop versions. I have enough corks left to make one large and two little ones.

Maybe someday we'll have enough to make this:
That's a lot of wine!

Take it easy
~J

Thursday, December 10, 2015

DIY Snowman Kit

Hi! Are you about ready for Christmas? I'm getting there. We're in the process of moving across country as well (moving + Christmas + two birthdays = not my best idea) but I'm still trying to keep as many traditions going as possible.

Each year I try and make a little something for our friends children. Two years ago I made the Indoor Snowball Fight. Last year for Christmas I made Do It Yourself Snowman Kits.


These are fun and inexpensive and you may have many of the supplies already. Ready to see how to make them? Let's go!

Here are the supplies I used: artificial carrot, black river rocks, large buttons, chop sticks, fabric scissors, golf tees, E6000 glue, a black top hat (from the Target dollar section but I've also seen some similar to this at Hobby Lobby), a wire hanger (not picture), and a fleece blanket.

The first step is making the carrot nose. As you can see in the photo above the carrots I used had some fake greenery in the top. I pulled that out and then used the E6000 to glue in a chopstick. The chopsticks work great but are too long so first I scored a grove around the whole thing using strong kitchen shears and then it was much easier to break it along the score line and glue it in.

Next I glued the golf tees to the black river rocks and the backs of the large buttons. I bought the river rocks from the Dollar Tree and I tried using ones that had a flat side for the tee to stick. I used larger rocks for the eyes and five smaller rocks for the smile.

Lastly, I used wire cutters to cut off the two bent ends of a wire hanger (where the red marks are on the photo below.) Then I squeezed them together so they made two very skinny U's. I pushed these through the two long sides of the hat from the outside top of the brim, right near the ribbon. (Sorry! I forgot to take a photo of this part.) This way, when the kids put the hat on their snowman they can use the hangers to dig into the snow so it won't blow away so easily.


To finish the kit I cut the blanket into 6 inch strips for the scarf and then wrapped it in a gold ribbon with a note attached.

We had so much snow last year but it was so cold that it was terrible for packing. This chubby little snowman was actually made by piling snow up on top of a large planter. He was very jolly.

And here is one of the happy recipients of our gift. I love his snowman. The curve of the eyes and the missing carrot nose make him look a bit mischievous :)

Hopefully I'll get the time to post about the gifts I made this year. I've been able to mail them all out except one because I still have to wrap the other gifts that go along with it for the rest of the family.

I hope your holiday preparations are going smoothly and you're keeping those traditions alive!
~J

Tuesday, September 22, 2015

K's 7th Birthday Party: Big Hero 6

Hello! How was your summer? Ours was fantastic. We took an amazing two-week vacation out to the West Coast, we spent a long Independence Day weekend at the beach, and our beautiful first-born child turned 7. [K] is such a fun, spunky, creative, unique, intelligent person. She is incredibly loving, very sensitive, and the kiddo loves to make people laugh.

For this birthday she wanted to have a Big Hero 6 party based off of the Disney movie. It sounded fun to me so off I went to find ways to make it happen. I started with the invitation. Thankfully there is a ton of art available on the Disney Wikia page. Here's what I came up with:

For the drink station, I found this excellent idea from the Play.Party.Pin blog to make a Nerd Lab sign using elements from the Periodic Table. (If you're unfamiliar with the movie, the main character, Hiro, calls the science lab where his brother goes to school, "The Nerd Lab." Unfortunately there is no "D" element so I went with Darmstadtium making mine Nerds Lab. Close enough.)

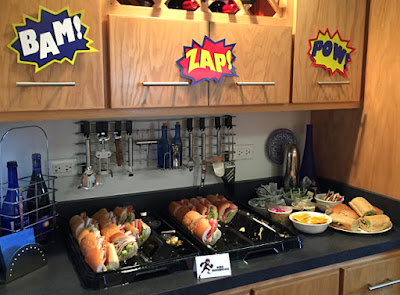
You can also see in the photo above that I had fun naming the food around the characters from the movie. In the drink canister was "Honey Lemon Tea", we had "Hiro Sandwiches" from Subway, "Wasabi Peas Trail Mix", "Mac 'n Cheese a-Go Go", "Fred's Fireballs of Meat", and "Baymax (Fist Bump) Fruit Skewers."

Above the sandwich station I made superhero sound effect signs.

My favorite decorations were the table centerpieces. They turned out SO cute! I found it on the UK Disney website along with several other fun printables that I put in the goody bags. I used three different superhero fabrics from Walmart (Wonder Woman, Batman, and Superman) to liven up the plain red tablecloths. I wrapped the silverware in red, yellow, and blue napkins and tied a Superhero Sucker in with it. The cape read, "Thanks for making my birthday SUPER!"


Near the drinks, where I was storing the dessert items until it was time, I used star balloons with Baymax's superhero mask on the red ones.


Speaking of dessert, instead of a fancy cake we went with an ice cream bar. We still had cake too because you can't really shove a big "7" candle into a scoop of ice cream, but it was nice to have options. The kids loved being able to make their own sundaes. The marshmallows were a big hit. I also had root beer for floats and bananas for a split.


I wanted to stick with the superhero vibe for the birthday banner so I created my own using the Superman shield with the red, yellow, and blue color scheme of the party. (My girlfriend gave [K] that awesome Baymax t-shirt, which she loves, so now they can be twins.)


Little Sister got in on the action too wearing her Honey Lemon and Go-Go t-shirt with her light-up superhero mask from the goody bag.


For the thank you cards I used Baymax's Pain Scale in reverse order and had [K] write on the back.


All in all I'd have to say the party was a success. Considering we returned home from our two-week vacation on the 19th and the party was on the 22nd, I think I've learned how to streamline a party to a few key decorations and not knock myself out over super cutesy foods and major expenses.

Thanks for stopping by. I hope you have a SUPER day!

Friday, March 13, 2015

St. Patrick's Day Paper Clover Tutorial

Hello! Are you enjoying some glorious spring weather where you live? I know I am! And with that comes one of my favorite holidays, St. Patrick's Day. I love dressing up in crazy green clothes, I love going to the parades, I love clover. How can you not love a plant that's made up of hearts?!?


I found a wonderful tutorial online for making paper clovers and just made a few tweaks to it.


The materials needed are four strips of 9" green paper and five strips of 11" paper (or 10" and 12" if you're using scrapbook paper), bakers twine or clear nylon thread, glue or glue dots (I recommend the glue dots), and scissors.

Fold all of the strips in half except for one of the long ones. To give the stem a more 3-D effect [A] suggested folding it with the flat bottom instead of just in half.

Put two glue dots on the outside top of a longer strip and curve the ends in to make a heart (see below.)


Do this for all four of the long strips.

With the shorter strips, put two glue dots on the outside top just like the longer strips but then stick that end to the inside of the bigger heart.

Place two more glue dots on the other end and curve that around and stick it to the other side of the big heart.

Repeat that for the other three hearts. Congratulations! You now have the semblance of a four-leaf clover.

In order to hang this you'll need to add your string before gluing all of the big hearts together. Take two glue dots and place them on the outside edge of one large heart. Stick your nylon thread or bakers twine to it and then press your other top heart on it.

You can see the nylon thread stuck between my top two hearts here. If you're only hanging one, you don't need to leave as long of a tail as I did. I strung three together on one piece of thread so I needed to keep mine longer for the last clover.

Next, attach one bottom heart to one top heart using two glue dots.

On the free side of the bottom heart attach two glue dots and press on your stem.
This picture looks a bit confusing because I'm pulling the stem away so you can
see where I placed the glue dots. However, the stem should actually be stuck to
that big heart via those glue dots.
 On the last heart place glue dots on both sides and press it in place.

Ta da! You have a beautiful three dimensional paper clover to display.

This next step is optional but I think it looks a lot nicer. Perhaps if I used a stiffer paper it wouldn't be necessary.

Place one glue dot on the side of each of the smaller hearts and press it into the corner of the larger heart. This keeps the bottom edges of the hearts together and gives more structure to your clover.

On mine you can see that I stuck all but the bottom left small heart to to the bigger ones and it just makes the whole thing look a little cleaner.

And here they are hanging in our holiday display window with Lucky the Leprechaun.

I've really been enjoying making paper holiday displays. They're quick, easy, (cheap!), and I can either keep them until next year or recycle them when the holiday is over.

So, whether you're actually Irish or just Irish on St. Patrick's Day, here is my blessing to you:

There are good ships,
And there are wood ships,
The ships that sail the sea.
But the best ships, are friendships,
And may they always be.