Showing posts with label sewing. Show all posts

Thursday, January 9, 2014

Indoor Snowball Fight

Happy New Year! I hope you had a joyous Christmas and have a happy and healthy 2014!

This Christmas I wanted to give some handmade gifts to our friends and families that would be fun for the kids and adults alike. I had seen Indoor Snowball Kits in previous years and decided to try making my own version. It was an easy project and each one came together quite quickly. Even though Christmas is over this is certainly a project that can be made anytime of year.

The supplies I used are:
- Lion Brand Wool-Ease Chunky Yarn in Tinsel White (This yarn is the perfect weight and color.)
- Clover Extra Large Pom-Pom Maker (This makes the job SO much easier.)
- Fiskars-Heritage Seamstress Scissors (A good pair of sewing scissors really helps.)
- Chart Toppers of the 80's CD (Ok, this one isn't exactly necessary but it helps to have some fun tunes on when you're crafting.)

To make the pom-pom snowballs, first I measured and cut 7 yard lengths of yarn. Then I used that one piece as a guide to cut several more 7 yard lengths of yarn. Eventually I noticed my later snowballs were seeming skimpier than my earlier ones so I remeasured a piece of yarn and found it was closer to 5 yards. I guess I hadn't been too careful in my cutting :(  I found that for the best snowballs that two 7 yard lengths per side made nice poofy pom-poms. They are soft enough that if you get hit in the face it doesn't hurt and they don't feel too yarn-bare in the hand.

Using the Clover Pom-Pom Maker took a bit of getting used to as there are several moving parts on it but once you've made a bunch, it's really easy and way less time consuming than the traditional way using cardboard templates.

Here's how I did it:
 - Wrap one side of the Clover Pom-Pom Maker with two lengths of 7 yards of yarn. You could always use one 14 yard length of yarn but I was concerned it would lead to too much tangling.

- Wrap the other side of the Pom-Pom Maker with two lengths of 7 yards of yarn. Also, as you can see in this picture I folded my yarn into fourths which made it easier to wrap since it wasn't so long.

- Slip your scissors in the grove of the Pom-Pom Maker and cut the yarn loops into loose pieces.

- Tie a length of yarn in between the grooves, around the entire pom-pom and double knot it tightly.

- Remove your pom-pom from the Pom-Pom Maker and trim off any long pieces of yarn. The more you trim, the denser your pom-pom will become. I left mine longer so the snowballs would be softer.

I ended up making 70 pom-poms (I still have two Indoor Snowball Fight kits to ship.) It was everything I could do to keep the girls from stealing them.


I found these cute plastic buckets with lids at the Dollar Tree store and made the personalized labels.

All in all I think they were a success. My brother, K, and her cousin A definitely had fun with them on Christmas so I count that as a win. :)

Saturday, December 14, 2013

Faux Chenille Baby Blanket

Ten days ago my best friends had their first baby, a gorgeous baby girl. I wanted to make something for her so when I saw the tutorial on Made for a faux chenille blanket, I knew that was it. I actually ended up using the Aesthetic Nest tutorial Dana on Made references because I liked the idea of using flannel for the back instead of just cotton making it nice and cozy for a winter baby.

While this is a (very) time consuming project, it's actually quite easy since all you have to do is sew straight lines so if you have a few hours on your hands (or days if you need to break it up like I did) then I highly recommend making one of these for a loved one. K already picked out the fabric she wants for hers and I helped E pick out hers. But, they're going to have to wait until AFTER Christmas!

Supplies


1 1/4 yards cotton fabric (this will be for the top of your blanket)
1 1/4 yards each of THREE coordinating cotton flannels (I used 100% cotton for all fabric)
Kitchen twine (the kind you tie around a pot roast)
Disappearing ink fabric marker
Yard stick
At least two spools of thread of a color that will show on the top of the blanket
2 packages of double fold bias tape
1 spool of thread to match the bias tape
Fabric scissors, or even better, a slash cutter (sometimes called a chenille cutter). I got mine from JoAnn Fabric using a 40% off coupon. I highly recommend it.

Steps


1. Lay out the top fabric and measure 45" square. Cut off any excess.

2. Use the cut piece of fabric as a guide to cut your pieces of flannel.

3. Using a piece of the kitchen twine, stretch it across on the DIAGONAL. This blanket will only work if you sew and cut it on the bias, which means the diagonal. Then, use the yard stick (or other long straight edge) and the disappearing fabric marker to trace that line.

3A. OPTIONAL: You can pin your blanket around the edges or use a few safety pins in the middle. I didn't pin mine at all because the layers of flannel keep it from shifting too much.

4. Sew straight down the line you drew. Continue sewing straight lines 1/2" apart. For the most part I just eye-balled the 1/2" spacing but occasionally if I felt my lines were getting too wonky, I would lay the blanket out on the floor and use a ruler to draw a line or two until they were straight again.
You can see my first 6 lines under K's hand.

5. Keep sewing straight lines. And sewing... and sewing... I started at the center and sewed one whole side. Then I spun the blanket around and sewed the other side. It's a bit ungainly because of the weight of 4 layers of fabric so I had to keep folding mine up so it would be easier to handle.

6. Cut off any excess flannel that might have shifted during sewing. Leave the top fabric though - it helps with the cutting in the next step.


7. Lay your blanket face down (flannel side facing up) and using your slash cutter or scissors, cut right down the center of each row you stitched - FLANNEL ONLY! Don't cut through your top fabric.

8. Spread the blanket out on a hard flat surface and using your ruler as a guide, square up each side and corner. This is much easier done with a rotary cutter and self-healing mat but it isn't absolutely necessary. (I found this step to be a pain in the bum and had to keep trimming off a little more, and a little more until I got it nice and square. It's important to have nice straight edges for the binding in the next step.)

9. Line up the binding so that the edge of your blanket is sandwiched in between the binding. I made mine with the edge all the way inside the binding so that I wouldn't miss any layers as I sewed.

10. And now the fun part - Washing the blanket! Throw the blanket in the washer and dryer and watch those cut rows of flannel turn into soft, fuzzy faux chenille.

Here's a comparison:
Before
After

Both girls loved the blanket and anytime I had it out on the floor to cut or measure they were all over it. Here's E enjoying the final results. She loved running her fingers in between the rows of wiggly flannel.

I hope Baby F will enjoy her new blanket as she gets a bit older and her Mommy and Daddy will tell her all about her crazy Faux Auntie who already loves her and can't wait to meet her.

Saturday, August 31, 2013

Easy, breezy, comfortable...?

I can't really call this tutorial "beautiful" to finish the Cover Girl quote above but it is definitely easy and breezy AND comfortable so there you go.

I originally saw this idea on Delia Creates and basically just copied her tutorial. It's super quick - no sewing required! - and if you have hair like mine, it's pretty awesome to keep all those crazy fly-aways in check.

Step 1: Find an old shirt lying around that you can cut up. Alternatively, you can pick up one for cheap at a second-hand store. I chose this shirt because it was right before we were leaving on our trip to OR and we'd be right near Astoria :)

Step 2: Cut off one of the sleeves on the INSIDE of the seam (i.e. you DON'T want the seam on the sleeve).


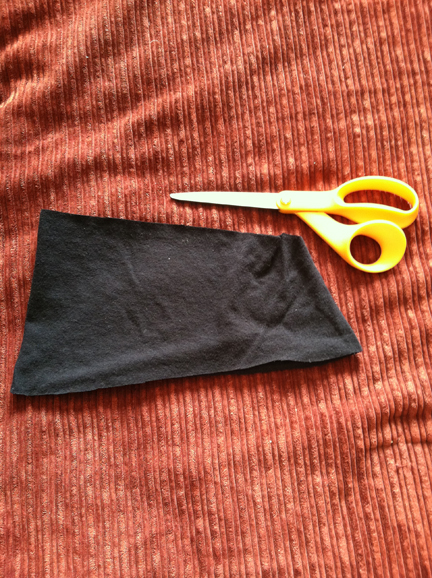
Step 3: Cut off the hemmed edge. You can cut extra if you want your head wrap a bit skinnier, like I did.


So this is what you'll be left with for your wrap. Since it's made from a t-shirt which is jersey fabric you don't have to worry about it fraying. It will probably roll a bit but that just adds to the comfortable styling.


Step 4: To give your wrap a bit more style you can make some cuts in it so it looks like three bands but they're still all connected at the bottom.

I ended up cutting off one of the slits because it felt too wide on my head but even with just the two it really holds all of my hair back and is pretty cute looking to boot! (Just don't look too close or you'll see all my gray hairs.)

Tuesday, April 30, 2013

Introducing Fergie and Ferdie

Hi and welcome back. I'm sorry that it's been a little while since my last post. We're planning a really cool vacation and I've been working on getting that set up almost every night so my little blog here gets pushed to the back burner.

Anywho, I made a few new stuffy friends as gifts for some very special birthday kiddos this month and I made a tutorial based off of the one from Darling Petunia in case you'd like to make some cute little Hedgehogs for the sweet kiddos in your life.
Ferguson and Ferdinand (Fergie and Ferdie)

Start with a microfiber car washing mitt. I got mine from the dollar section at Target but I think I've also seen them at a dollar store.


Cut off the cuff and the thumb. It's best if you leave a bit of fabric between where you cut off the cuff and the thumb. You'll be using the thumb hole to stuff your Hedgie and will hand-sew the hole closed so it's easiest if you have that bit of fabric there.


Hand stitch on eyes. I used small black ball buttons and embroidery thread.


Turn the mitt inside out and trim the opening into the snout of your Hedgie. Machine or hand stitch the snout closed.


Turn your Hedgehog back right side out and stuff him full of fluff in the open thumb hole.


 Hand stitch the opening closed. I used a ladder stitch. It's a great almost-invisible stitch that's not hard to learn. Here is a link to the YouTube video I used to learn the ladder stitch.


Attach a pom pom nose. I made the pom pom from black yarn and I used black embroidery thread to attach it. Making your own pom poms is really easy and fun. Here is a link to the blog site, Made, where I learned to make them.


And there you have it - a cute little Hedgehog friend to hug and cuddle and throw around. Or maybe dust the floors or wash the car...

Tuesday, February 5, 2013

Pillowcase Pajama Pants

We interrupt our regularly scheduled blog about our vacation to the Pacific Northwest to bring you MY FIRST SEWING TUTORIAL!!! (It's almost too easy to even be a tutorial and basically I just repeated the exact same steps from My Two Butterflies where I got the idea from originally but here goes.)

These pants were made using two standard size pillowcases. They are made for a child size 6-6X.

 Step 1. Select a current pair of pants that you like the fit and fold them in half to use for your pattern. Lay your pillowcase open just as you would if you were going to stuff a pillow into it (and if yours have the serious fold lines in them like mine do, you might want to iron them first. As you can see, I didn't.) Line up the outside seam of your pants on the folded side of the pillowcase. Trace around your pants adding a 1/4" - 1/2" seam allowance. At the waistband you'll want to go straight up to the top of the pillowcase instead of following the current waistband. This is to account for the elastic waistband and casing you'll be adding. The elastic will pull the waist in just like your current pajama pants. (Click on any of the pictures to see them larger for a better explanation.)


Step 2. Cut that piece out and then lay it on your second pillowcase, also on the fold. Now cut out your second leg WITHOUT adding a seam allowance since you already accounted for that in the first leg that you just cut out. (As a side note, these pants can be made out of only one pillowcase if you start with a skinnier pants as your pattern piece. I happen to like the wide-leg look and feel of the original pajama pants but that led to me having to use two pillowcases for my new pants.)


Step 3. Cut off the closed end of the two pillowcase legs you've created.


Step 4. Open up the two pieces you cut out and lay them down, right sides together (so you're looking at the inside, or wrong side, of the pillowcase.) Pin along the two curves and sew.


Step 5. Open up your pillowcase pants and revel in the fact that they actually look like pants!


Step 6.Pin the inseam together and sew. I used a straight stitch for these pants since the fabric is cotton but you could also use a zig-zag for added durability.


Step 7. Measure the waist of your recipient and subtract an inch - that will be the length of elastic you will cut. For example, if my waist was 32" then I would cut a piece of elastic that is 31" long. Also, determine how wide your elastic is so you know how big to make your casing. My elastic was 1/4" wide so I made my casing 1/2" so that it would be easy for me to thread the elastic through. To make the casing, fold your waist down 1/4" and press with an iron. Then fold it down another 1/2" and press and pin. Or, you can do what is called "finger press" which is creasing the fabric with your fingers instead of breaking out the iron. That's how I did these pajamas because I was going for ease and this fabric creases easily (as evidence by the fold marks.) **Be sure to leave a 1 - 2 inch gap open for threading the elastic.**


Step. 8 Unfortunately I didn't take any pictures of this step but how I do it is I stick a safety pin through the end of my elastic and use that to thread it through my casing. Just don't forget to hold onto the other end so it doesn't accidentally getting pulled through. Once the elastic is all of the way around, sew the two ends together and then sew your opening closed. I also like to sew across the elastic right on the outside of the waistband on the two sides and the back because there are few things more annoying to me than to have the elastic in my clothes twisted.


Step 9. Give the pajama pants to the sweetest little Godchild on the planet and be amazed at how easy they were to make ;) Then go make 10 more pairs!


The cost for these pants were $0.00 since I already had the pillowcases, thread and elastic. However I think using some vintage pillowcases found at a thrift store would be cool or even some that have the fancy scalloped edge.

For another great idea on repurposing old pillowcases, check out One Crafty Broad, also known as my super awesome sis-in-law :)


Sunday, September 26, 2010

I used my sewing machine (finally)!!!

I'd been wondering if the idea I had for K's Halloween costume was still going to fit her so on Friday I decided to pull it out of the storage bin and try it on her. It's a size 2 so I was a little concerned but after some struggling (and her screaming "tight" at me) I managed to get it on her. The top is stretchy Lycra material but the arms and skirt don't have any give at all so we have to work a little harder to get her arms up into the sleeves. However, there were a few modifications I wanted to make to it first.

The base of the costume is a super cute red and black Flamenco dress my parents brought back from Spain. Since K is obsessed with Mickey Mouse Clubhouse I thought I could use the dress as a Minnie Mouse costume. The first thing I needed to change on it to accomplish this goal was the fringe.
This is how it looked originally with the fringe (and a sippy cup)

I'm not much of a fringe person (at all) so originally I thought I'd just cut it off and that would be that. Unfortunately "that" is never quite "that". After cutting off the fringe some of the top part that was still attached wasn't all straight and it was starting to unravel a bit. All in all, it looked kinda crappy so I had to come up with a way to fix it. Plus where the fringe met in a V at the middle on the front and back wasn't perfect so I wanted some kind of Minnie Mouse cameo pin to put right at that point to kind of cover it up and make the costume more fancy and more "Minnie". I went to Jo-Ann Fabrics looking for some red with black polka dot ribbon - no luck, only red with white polka dots or pink with black polka dots.Then we went to Michaels, still no luck on the ribbon I wanted. While I could have checked Hancock Fabrics, it's a bit farther away and I was being impatient. So I decided to look into other options for the ribbon. I thought about plain red but I couldn't find one that was a perfect match. I thought about plain black but with the shininess of the Lycra, a plain ribbon didn't look quite right either. I ended up with black velvet and I think it looks really great.
(Please ignore the pile of mail under the dress. The left side is finished with the black velvet ribbon and the right side is how it looked with just the fringe cut off.)


Also, I couldn't find any Minnie Mouse cameo pins so I looked at buttons, jewelry and finally ended up with these awesome Disney embroidered stickers.
Totally cool.


 Finally, after having to rip out my first attempt because I sewed the ribbon on with a stitch right down the middle that didn't hold it down enough to cover up the raw part of the remaining fringe, I figured it out. I had to make two lines of stitches, one at the top of the ribbon and one at the bottom so the velvet would stay flat and keep all of the yucky parts covered. I added the large red Mickey head sticker right at the tip of the V on the front and the large black Mickey head sticker at the tip of the V on the back.
Tee Da! (I moved the mail so it looks a lot nicer.)

Being a long time Disney fan myself, I already had a very nice pair of furry Mickey ears that I've had for years. I bought a roll of wired red with white polka dot ribbon and made a big bow and sewed that onto the ears. Here's a before shot:
Doing her best pirate face.

All in all I think it turned out very cute and the best compliment I got was from the Hubbs saying he wished it was bigger so she could wear it longer. :) I'll post a complete shot of the whole costume when she wears it on Halloween.